

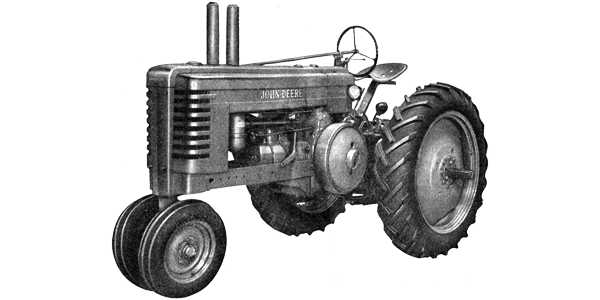
John Deere Model A Tractor
John Deere Model A Tractor
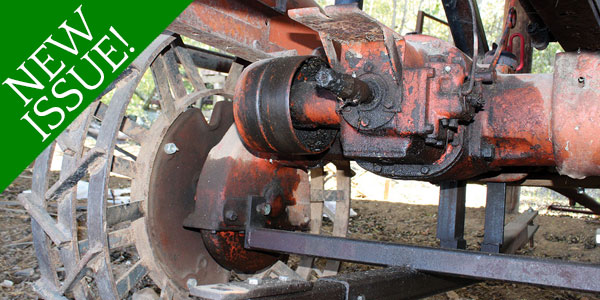
Many Journal readers rely solely on horse or mule power. Quite a few use only tractors and a whole ‘nother bunch prefer to combine power sources. A small group of farmer folk keep an old tractor around solely for belt power for such things as stationery threshing machines. A popular model for such jobs is the John Deere Model A tractor showcased in this article. The information we have is extensive, we are presenting just a small portion.
OPERATOR’S MANUAL


Clutch lever, throttle, fuel control and radiator shutter control are reached easily from the operator’s seat. Under your feet are the brakes, hydraulic power lift foot control pedal, and a large, comfortable platform on which you can stand if you so desire.
Familiarize yourself with all the controls provided for safe and easy operation of your new tractor. Regardless of your previous tractor experience, study this section covering controls carefully before you operate your tractor.

SEAT
The large, bucket-type seat is high up and well forward. You are generally out of the dust where you have a clear, unobstructed view of your work.
The seat (and seat standard) ride on a coil spring that can be tightened or loosened to conform with the operator’s weight for improved riding comfort. When working on rough ground or for heavy operators, more compression should be applied to the coil spring.
Whether you are tall or short, the seat can be adjusted backward or forward to a comfortable position by means of seat attaching bolt located directly under the seat.

STEERING
Due to the high, centered seat location, tapered fuel tank, and narrow, streamlined design, you can easily see what you are doing at either side. This design, coupled with a steering mechanism built to eliminate entirely objectionable wobble, backlash, or whipping of the steering wheel, even in the roughest going, permits you to work in freedom and comfort.
Smooth, responsive steering can be maintained throughout the life of your tractor by means of the adjustments provided for this purpose.
Adjustments can be quickly and easily made by your John Deere dealer’s serviceman.


SHUTTER AND FUEL CONTROL WITH HEAT AND OIL GAUGE
The temperature of the tractor is effectively controlled from the driver’s seat by means of a manually operated radiator shutter.
The engine temperature gauge is located in plain sight of the operator and indicates when to adjust the shutter.
For best operation, the engine should always be operated up to its proper temperature, which is 190°F. registered on heat indicator. This results in greater all-around economy, better lubrication and more power.
A convenient, three-way fuel control lever, located on the instrument panel, enables the operator to switch from gasoline to low-cost fuel or to shut off the fuel supply entirely without leaving his position at the wheel.
Also located on the instrument panel is the oil pressure gauge. This gauge does not in any way tell the amount or condition of the oil in the crankcase. It only indicates whether the oil pump is working. The indicator hand of the gauge should rest between the letters “M” and “H” when the engine is running fast idle. If pressure is not registered on the oil gauge when the engine is started, stop the engine immediately.

CHOKE
When starting the engine, set choke in full choke position. (On tractors equipped with electric starters, choking is accomplished by a button, mounted on the instrument panel.) On tractors not equipped with electric starters, choke lever is on the carburetor.
Over-choking or excessive use of the choke will flood the engine, causing hard starting.

ENGINE CRANKING
Hand Cranking: The flywheel method of starting is simple, safe, and easy. You simply grasp the flywheel and roll it forward slowly.
All controls are within easy reach.

Electric Starting: To start the tractor, pull choke, and step on starter lever.
The starter motor is geared into the flywheel which is protected by a guard.
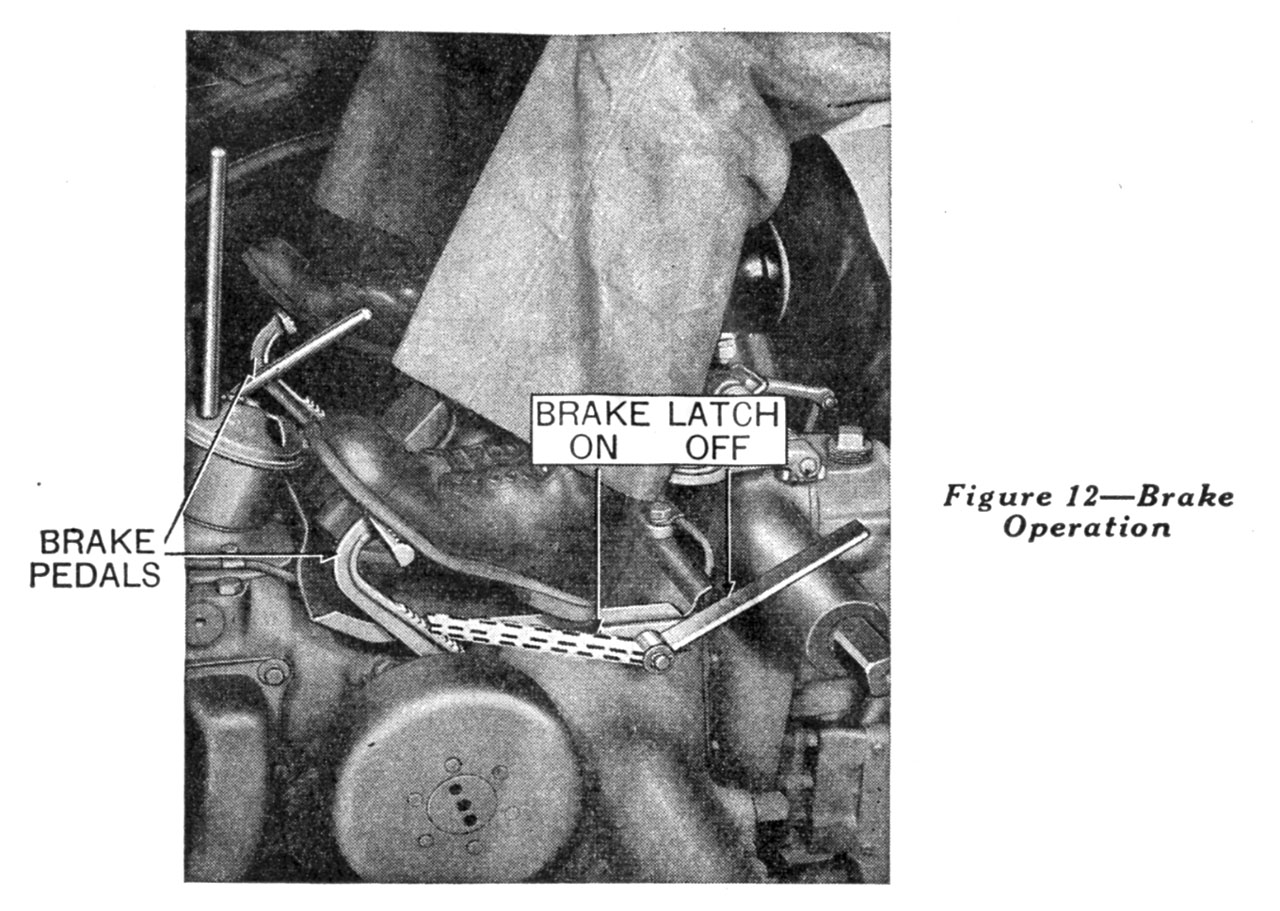
BRAKES
Individually foot-operated differential brakes makes possible short turns to right or left at the row ends.
If the brakes are pressed simultaneously with both feet, they assure you safe stopping at high transport speeds.
A brake latch is conveniently located for locking each brake when doing belt work or when stopping the tractor on a hill or incline.
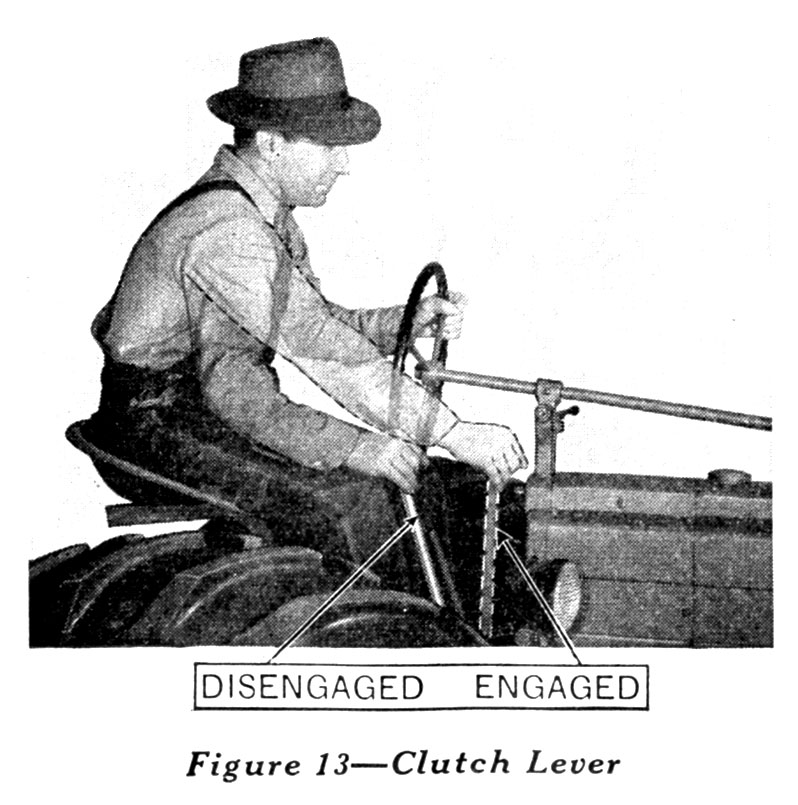
CLUTCH LEVER
The power required in putting the tractor in motion is gradually and smoothly applied to the drive system by slowly pushing the clutch lever forward. As the tractor picks up speed, give the lever a quick forward thrust until the clutch snaps into engagement.
By pulling back on the clutch lever, the clutch is released and the engine disconnected from the transmission. The pulley brake, which is a part of the clutch lever, stops the pulley from rotating, permitting easy shifting of the transmission gears.
When the engine is running and the tractor is not moving, the life of the clutch parts and pulley bearings can be prolonged by shifting the gear shift lever into neutral and engaging the clutch. This allows the pulley and crankshaft to turn as one unit, reducing frictional wear, and lengthening the life of clutch parts.
GEAR SHIFT LEVER
Familiarize yourself with the shifting diagrams before you attempt to operate the tractor.
If gears do not shift freely, move clutch lever forward until pulley turns slowly. This allows gear teeth to line up for shifting.
Avoid clashing of gears. This causes unnecessary wear and possible breakage.
POWER SHAFT
The power shaft is started and stopped with the clutch lever and can be operated whether the tractor is moving or not. To put the power shaft into operation, first move the power shaft shift lever to the engaged position, with gears in mesh. With the engine running, engage the clutch and the power shaft will operate.
Whenever the use of the power shaft is not required, disengage the power shaft shift lever.
The power shaft flipper guard should never be removed from the tractor. Do not operate the tractor with the end of the power shaft exposed. If the flipper guard is damaged, repair or replace it immediately.
Note: Make it a standing rule never to dismount from the tractor without first disengaging the power shaft lever.
POWER LIFT
The hydraulic power lift is simple and positive in action and provides a cushioned drop for all equipment. To put the power lift into operation, first move the power shaft shift lever to the engaged position. With the engine running and the clutch engaged, the power lift is now ready to function. To operate the power lift, step down on either pedal with the heel of either foot.
Equipment can be raised or lowered while the tractor is in motion or standing still.
BEFORE STARTING THE ENGINE
Before attempting to start or operate the tractor, familiarize yourself with the tractor and its various controls. Also check the following:
- Check radiator water level, and, if necessary, add water up to bottom of baffle. (Use soft water or rain water if possible.) During freezing weather—where water has been drained to prevent freezing, do not start the engine before drain plug has been installed in bottom of cylinder head and radiator filled with water. (Capacity of cooling system, 9 U.S. gallons.)
- Check amount of fuel in front tank. Always use clean fuel of the type recommended for your tractor. (Capacity of fuel tank, 15 U.S. gallons.) Gasoline in the small rear tank is used for starting and warming up the engine. Fill with clean gasoline. (Capacity, 1 U.S. gallon.)
- Check oil in the air cleaner for quality, weight, and amount.
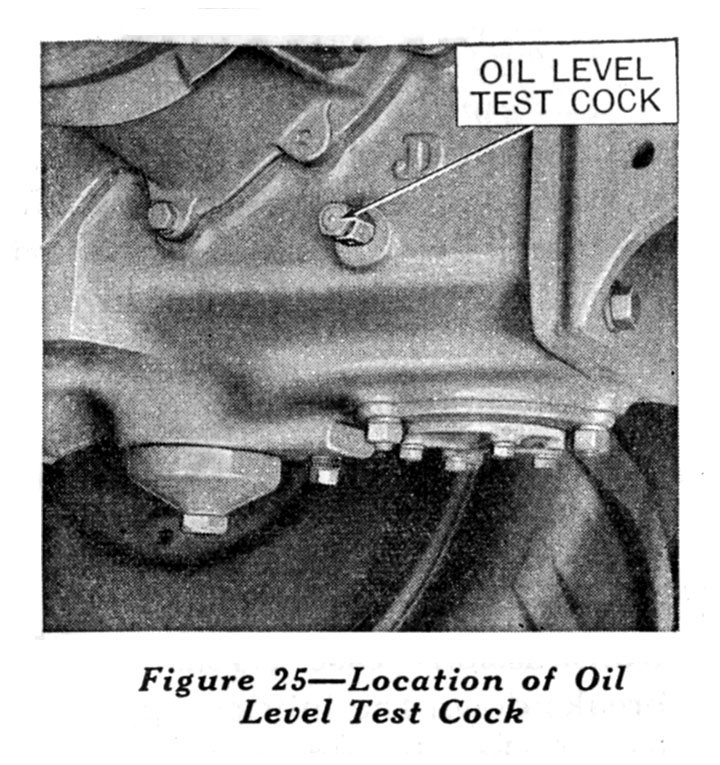
- Check crankcase oil level. If necessary, add a good grade of 10-W oil until oil runs out at the oil level cock. Note this oil must be drained after 20-hour “breaking-in” period and refilled with the weight of oil recommended in “Weight of Oil” chart.
- Check air pressure in pneumatic tires before moving the tractor. Inflate to correct pressure according to inflation chart. Tire inflation should be checked at least every two weeks.
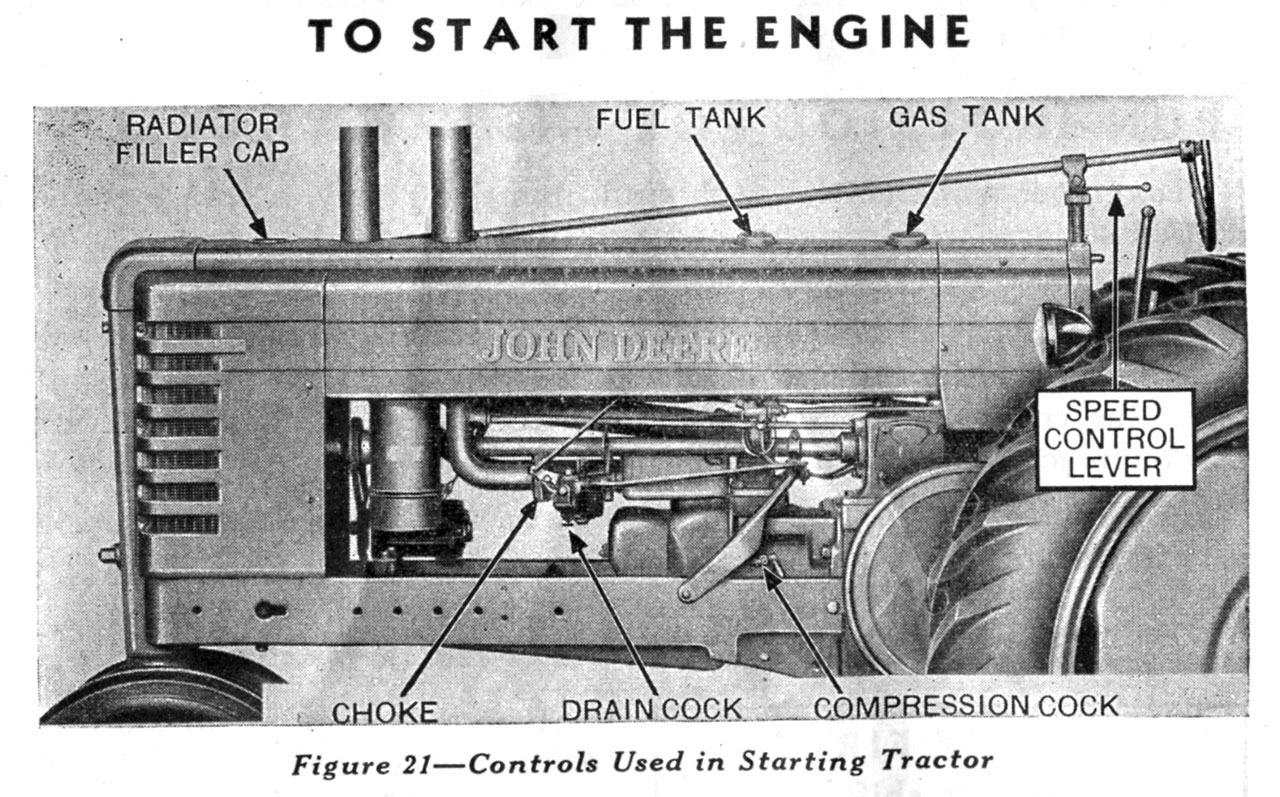
TO START THE ENGINE
- Close the radiator shutter, set gear shift lever in neutral and pull the clutch lever back into the disengaged position.
- Advance speed control lever halfway.
- If the engine had been burning low-cost fuel when it was stopped, drain the carburetor.
- If the carburetor adjustments have been changed, adjust load and idle needle according to instructions in “Adjusting the Carburetor.”
- Turn on gasoline by turning the fuel control lever to the mark “G”.
- Open compression relief cocks.
- Place choke in closed position. (For hand cranking, choking is done at the carburetor. With electric starter, choking is done by pulling choke button on dash.)
- For hand cranking, roll top of flywheel forward to start engine. With electric starter, step on starter control lever located on starting motor.
- As soon as engine fires, open choke immediately to prevent flooding.
- With engine running with speed control lever in forward position, the hand of the oil pressure gauge must be between “M” and “H”.
- Close the compression relief cocks.
- When heat indicator shows 180°F., turn fuel control lever to mark “F”. DO NOT TURN ON FUEL BEFORE HEAT INDICATOR SHOWS 180°F. PROPER WARMING UP OF ENGINE IS ESSENTIAL FOR SATISFACTORY OPERATION OF TRACTOR ON FUEL.
- Maintain an engine temperature of 190°F. by either opening or closing the radiator shutter.
- Regulate engine speed by the speed control lever.
- The engine is set to run at the correct speed when the tractor leaves the factory; 975 R.P.M. for full load and approximately 1075 R.P.M. for fast idle. Caution: UNDER NO CIRCUMSTANCES SHOULD THE ENGINE BE OPERATED AT AN IDLE SPEED OVER 1075 R.P.M.
WARM UP PERIOD
Before you put your tractor on full load or into too high a gear, be sure it is warmed up (190°F.). This will give the oil a chance to circulate freely and will save undue wear on piston rings, cylinders, and bearings. Avoid racing the engine during the warm-up period because this wastes fuel.
OPERATING THE TRACTOR
Your John Deere Tractor has a range of speeds. These various speeds not only give you the flexibility and adaptability you want, but also they enable you to balance the load and the speed for maximum economy. However, if you are handling a light load and want to travel at slow speed, it is far better to put your tractor into the gear which gives you the speed you want than to use a higher gear and throttle down.
DRIVING THE TRACTOR
- With the engine running, release the brake latches on both rear wheel brakes.
- If necessary, pull the clutch lever back until pulley brake stops the pulley from rotating.
- Shift the gear shift lever into the gear speed desired. If gears do not shift freely, move the clutch lever forward slightly, permitting the pulley to turn slowly. This allows gear teeth to line up for each shifting. SHIFT GEARS CAREFULLY. CLASHING GEARS CAUSES UNNECESSARY WEAR AND BREAKAGE. BE SURE THE GEAR SHIFT LEVER IS MOVED FAR ENOUGH TO PLACE GEARS IN FULL MESH.
- When gears are shifted, push clutch lever forward slowly until the tractor picks up speed, then give the clutch lever a quick forward thrust until the clutch snaps into engagement.
A GOOD OPERATOR IS A SAFE OPERATOR
- Reduce speed when turning or applying individual brakes.
- Watch for obstructions. Be cautious near ditches or on steep hillsides.
- Allow no riders unless seat is provided.
- Never operate tractor unless power take-off is shielded.
- Read and observe safety rules.
HIGH SPEED DRIVING
The purpose of the high speed in your tractor is to save you time on highways or on smooth-surfaced secondary roads and in going to and from your fields. Regardless of road or field conditions, use care in driving your tractor in high gear. Fast driving is the cause of many accidents. As a safety factor, shift to a lower gear, particularly over rough ground and save your tractor and tires from under strain and possible breakage.
Caution: At high speed (5th and 6th speeds), the brakes should be adjusted evenly to avoid drawing the tractor to one side. However, independent brakes on your John Deere tractor enable you to correct or compensate for brakes that are not equally adjusted by merely changing the amount of foot pressure you apply.
Do not jam on brakes especially when one wheel is spinning because this suddenly throws a tremendous load on the transmission and can cause breakage.
Note: Reduce engine speed first before applying brakes.
DRAWBAR LOAD
All drawn tools should be hitched to the drawbar. Do not draw or pull anything from any other place on the tractor.
When hitching the tractor to a stump or heavy load by means of a long chain, take out any slack in the chain before the power is applied to eliminate jerking into the load.
OVERLOADING
Your tractor is designed and built to handle economically and efficiently all jobs within its range of power. To use your tractor on loads beyond its power range results in undue strain on all of its parts and will eventually result in unnecessary repair expense and impaired efficiency of operation.
Your tractor was designed to pull its normal load with the throttle lever near the three-quarter open position, but 20 to 25 percent of its power beyond the normal load is available to pull you through tough spots in the field or to clean out a belt machine that has been fed unevenly. As soon as the throttle reaches the full open position, you are using its full power. Beyond this, you are overloading your tractor. An overloaded tractor usually can be detected by a gradual slowing down in speed and a slowing down and laboring of the engine.
BELT WORK
Never leave the tractor running unattended when adjustments are being made on the driven machine, even though the clutch is disengaged.
Never use a stick to force a belt on or off a revolving pulley. To put on or take off belt, move tractor forward to provide slack. After backing tractor into belt, be sure the tractor is well blocked and both rear wheel brakes are locked. Always start a belt load slowly.
Note: After backing the tractor into the belt and setting each brake latch, it may be difficult to get the gear shift lever into neutral. This is due to bind on the gear teeth caused by the pull of the belt. To relieve the bind, turn the belt pulley backwards by pulling on the belt, after which the gears can be shifted easily into neutral.
SERVICE SUGGESTIONS
Regardless of how familiar you are with the type of equipment used with your tractor, take the time to study the recommendations made by the manufacturer in the instruction book that came with the equipment.
SAFETY SUGGESTIONS
In your everyday work around farm equipment remember this: An accident is usually caused by someone’s carelessness, neglect, or oversight. Safety rules, if practiced, will make your farm safer for you and those who work for you.
STOPPING THE TRACTOR
To stop the tractor, throttle engine down, disengage the clutch by pulling the clutch lever clear back. As soon as the clutch is disengaged, the rear wheel brakes can be used to bring the tractor to a full stop. DO NOT USE THE PULLEY BRAKE TO STOP THE TRACTOR. This shortens the life of the pulley brake lining.
To reduce wear on clutch facings, always place gear shift lever in neutral after disengaging clutch, and then re-engage clutch again if engine is idling. This is important.
If the tractor is burning low-cost fuel during the time the engine is idling, a more satisfactory engine temperature can be maintained more easily by closing the radiator shutter and placing the throttle lever in the half-open position.
STOPPING THE ENGINE
In cold or freezing weather, idle your tractor a few minutes before you stop it, to cool it off gradually. Sudden cooling of a hot engine causes extreme contraction of the heated metal parts. In freezing weather, never drain the water immediately after stopping, for the same reason. You are assured of better performance year in and year out if you follow this practice.
While there are several ways of stopping your tractor, there is only one correct way. By following this, you can be assured of easier starting.
To stop the engine, especially if it is burning the low-cost fuels, shut off the fuel at the fuel control lever and drain the carburetor bowl. This cuts off the fuel supply to the engine and , after a few revolutions, the engine will stop, leaving the combustion chambers dry—an important contribution to easy starting of the engine.
Caution: Do not stop the engine by pulling back on the hand throttle or by shorting the magneto. This leaves several charges of unburnt fuel in the cylinders, which will reliquefy as the engine cools and permit this liquid fuel to lay on the electrode and porcelain of the spark plugs to provide a path for the spark to escape and result in hard starting. Liquid fuel left in the combustion chamber will also wash the lubricating oil off the pistons, rings, and cylinders, thus breaking the oil seal and causing poor compression—also a factor in hard starting.
LUBRICATION
Effective lubrication of your tractor is perhaps the most important step towards low upkeep cost, long life, and satisfactory service, for without oil or grease you can ruin the important working parts of your tractor in a very few minutes’ time in the field.
PURPOSE OF LUBRICATION
You use oil and grease in your tractor to separate metal parts that otherwise would work against one another. If properly lubricated, these parts never touch. Oil of the right weight acts much the same as tiny ball bearings to keep the wearing parts separated.
STORAGE OF LUBRICANTS
Your new tractor is equipped with various safeguards such as an air cleaner, oil filter, crankcase breather and ventilator—safeguards designed to keep dust, dirt, and other abrasives from reaching operating parts. You can increase the efficiency of these safeguards by using clean containers for storing and for handling all of the lubricants. See that only clean lubricants go into the working parts of your tractor.
ENGINE LUBRICATION
Quality of Oil
The engine of this tractor, with its full force-feed pressure lubricating system, has one of the finest oiling systems it is possible to produce. Do not handicap it by trying to save money with cheap oil. High-grade oils withstand heat and wear for a longer time. Cheap oils soon become thin and lose their lubricating qualities.
It is impossible to determine the quality of oil by its appearance. As a result, inferior oil often is sold as a quality product at a lower price. It pays to buy only nationally known, high-quality brands of oil. Don’t take chances.
Weight of Oil
Your John Deere tractor was made with the same precision as a fine automobile, with clearances between bearing surfaces as fine as a ten-thousandth part of an inch. If oil is expected to lubricate these surfaces, it first must get there. Therefore, weight or viscosity of the oil is very important.
As soon as oil of the correct weight and quality reaches bearing surfaces, it immediately begins functioning to relieve friction, carry off heat, to create an oil seal between rings and cylinders, thus preventing blow-by and loss of power, and last, to carry away elements such as carbon, dirt, and other abrasive materials that are harmful if left between metal working surfaces.
Oil of the wrong weight can result in loss of power, excessive fuel consumption, undue wear on moving parts, and eventual replacement of costly parts.
Remember this: the temperature in the crankcase correspondingly varies with the outside temperature. Therefore, it is important to use oil in the new engine according to the recommended temperature and weight chart below which has been scientifically worked out with leading oil companies.
| Temperature | Engine Crankcase | Air Cleaners |
| Above 90°F | S.A.E. 50 | S.A.E. 50 |
| 65° – 90°F | S.A.E. 40 | S.A.E. 40 |
| 32° – 65°F | S.A.E. 30 | S.A.E. 30 |
| 10° – 32°F | S.A.E. 20-W | S.A.E. 20-W |
| Below 10°F | S.A.E. 10-W | S.A.E. 10-W |
Crankcase oil capacity: 8 U.S. quarts, including oil filter compartment.
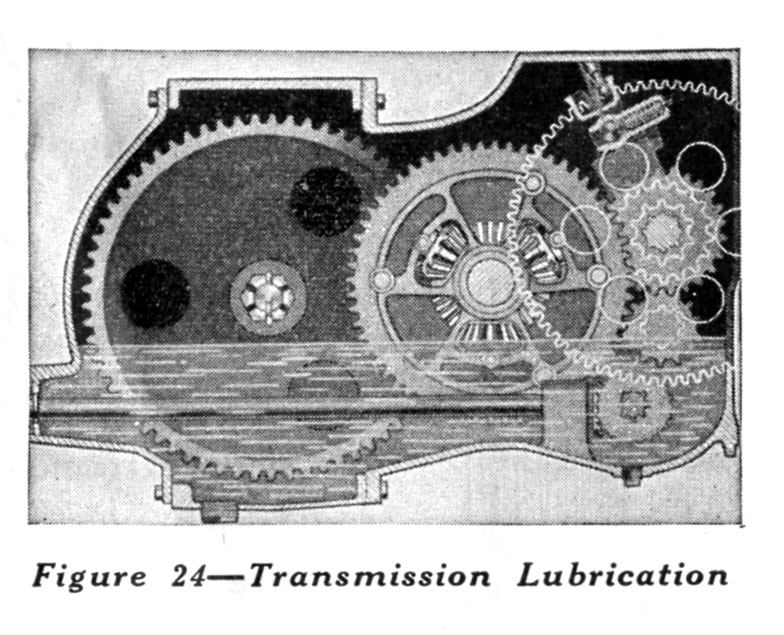
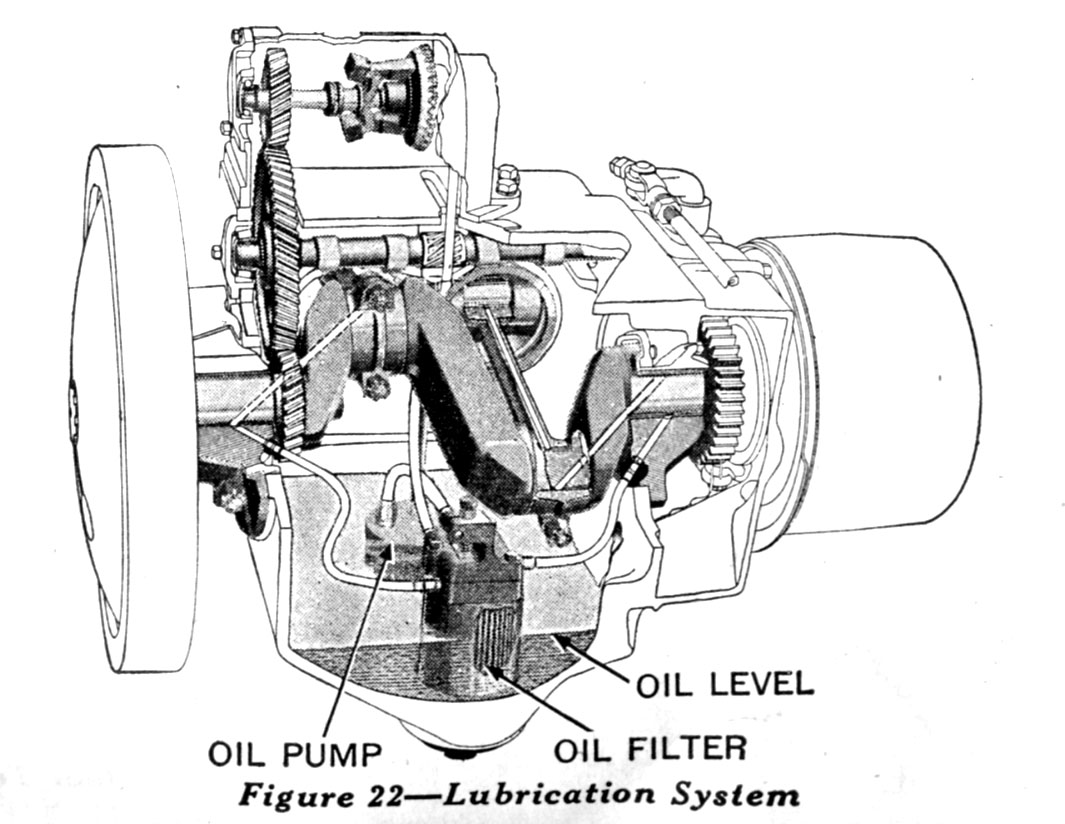
TRANSMISSION LUBRICATION
Lubrication of the transmission and differential is entirely automatic—it starts and stops with the engine. The differential and final drive gears are partially submerged in transmission oil and when they revolve, oil is carried up to all transmission parts, completely bathing gears, shafts, and bearings.
Changing seasons and temperatures, together with heating and cooling of the tractor, cause condensation and eventually an accumulation of water in the main transmission case. This water breaks down the lubricating quality of the oil and is one reason why transmission oil should be changed regularly.
Each spring the transmission should be drained and washed out.
Weight of Oil
| Temperature | S.A.E. Viscosity Numbers | Oil Capacity |
| 32ºF and up | S.A.E. 140 | 8 gal. U.S. |
| Below 32ºF | S.A.E. 90 or dilute the transmission oil with S.A.E. 10-W (see yearly service) |
PERIODIC LUBRICATION SERVICE
10-HOUR SERVICE
At the end of each ten-hour run: (1) Check the oil level in the crankcase; (2) change the oil in air cleaner cup; (3) service crankcase breather core; and (4) service all grease fittings.
Note: If tractor is operated in extremely dirty conditions or operating at maximum load, it may be necessary to check and service your tractor at the end of five hours’ run.
Checking Crankcase Oil Level
If oil level in the crankcase is low, remove breather stack and filter core and add a good quality oil of the correct weight until it runs out of the oil level cock. For instructions on changing crankcase oil, see “120-Hour Service.”
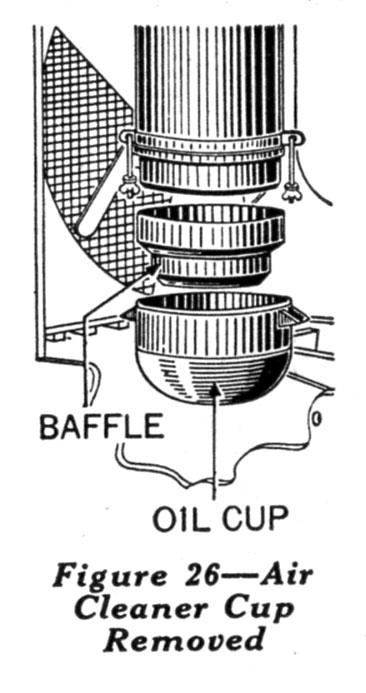
Servicing Air Cleaner
The air cleaner is built into the tractor to prolong its life and usefulness by preventing dirt, sand, and grit from going into the engine, which will cause wear on all of the operating parts. The air cleaner requires attention every ten hours of operation.
To service—remove oil sediment cup from lower part of air cleaner; pour out oil and sediment. Wash out cup with fuel. Refill cup to mark “Oil Level” with new engine oil.
Under extremely dusty conditions, service cleaner twice a day.
Note: Do not service air cleaner with engine running.

Servicing Crankcase Breather Core
To service, remove stack, lift out filter core and wash it thoroughly. Shake core vigorously to remove fuel from core, and submerge in clean engine oil for five minutes until core is thoroughly soaked. Install breather core and replace stack.

Servicing Grease Fittings
Service all grease fittings with pressure gun grease, wiping off fittings beforehand. Chart indicates frequency and amount of grease for each fitting.
SPECIFICATIONS
CAPACITY: 2-16” plow bottoms or a 2-bottom bedder under normal conditions or 3-14” plow bottoms or a 4-bottom bedder under favorable soil conditions.
Maximum Belt Horsepower: 29.59
Maximum Drawbar Horsepower: 26.20
Maximum Pull: 4110 lbs. at 2.25 M.P.H. (Nebraska Tractor Test No. 335)
SPEEDS
Forward: 2-1/2, 3-1/4, 4-1/4, 5-1/2, 7-1/3 and 12-2/3 M.P.H. on 11-38 (regular) pneumatic tires
Reverse: 4 M.P.H.
ENGINE
Engine: Two-cylinder cast in block—valves in head.
Engine Speed: 975 R.P.M. (Load)
Bore and Stroke: 5-1/2” x 6-3/4”
Displacement: 321 cubic inches
Compression Ratio: 4.50 to 1
Carburetor: Natural-draft type
Magneto: High-tension with automatic impulse
Spark Plugs: 18 mm. Champion No. 8 Com. C. or Edison Z-19. Spark plug gap .030”.
Lubrication: Full force-feed pressure system; with Purolator oil filter element. Total oil capacity—9 U.S. quarts.
Cooling System: Thermo-siphon system with a water capacity of 9-1/4 U.S. gallons.
Air Cleaner: Oil-wash type.
Fuel System: Gravity-feed fuel system. Gasoline tank capacity—1 U.S. gallon. Fuel tank capacity—15 U.S. gallons.
Clutch: Hand operated two 10” dry disks.
Belt Pulley: Diameter 12-3/4”; width 7-3/8”; 975 R.P.M.; Belt Speed 3270 F.P.M.
TRANSMISSION
Transmission: Six speeds forward and one in reverse.
Gears: Selective type straight spur cut gears, forged, cut, and heat-treated.
Bearings: Shafts operate on 2 Hyatt Rollers, 4 Timken-tapered, and 6 new Departure ball bearings. Oil capacity—8 U.S. gallons.
REAR AXLES: 2-3/4” diameter. Mounted on 4 Timken-tapered roller bearings.
REAR WHEELS: 11-38 6-ply tires, mounted on cast disk wheels, recommended for average field conditions. NOTE: Cast disk wheels approximately 250 pounds heavier than steel wheels. Steel spoke wheels wit lugs available as special equipment. Diameter 50”. Face 6”. (furnished with 4 speeds only.)
REAR WHEEL BRAKES: Two automotive type internal expanding rear wheel brakes.
FRONT WHEELS: Reversible for added clearance. 5:50 x 16” 4-ply rubber tires. Mounted on 4 Timken-tapered roller bearings. Steel spoke wheels with guide bands available as special equipment. Diameter 24”. Face 4”.
DIMENSIONS: On regular 11-38 pneumatic tires. Wheel base 90”; over-all height 80”; height to radiator cap 62-3/4”; over-all length 131”; width 82-3/8”; rear wheel tread adjustable from 56” to 88”; clearance 26”; turning radius 8’ 7-1/2”. Drawbar conforms with A.S.A.E. standards.
POWER TAKE-OFF: Shaft diameter 7/8” to 1-3/8”; R.P.M. 546; splined end is 23” above ground, right of center-line of tractor and 14” ahead of hitch. Conforms with A.S.A.E. standards.
SHIPPING WEIGHT: 3962 lbs. on steel wheels, 3978 lbs. on 11-38 6-ply pneumatic rear tires, pressed steel wheels, and 5:50 x 16” 4-ply front tires.