


Plowing with a Draft Horse Part 2: Harrowing and Seeding
Plowing with a Draft Horse Part 2: Harrowing and Seeding
by Paul Birdsall of Penobscot, ME
This is the fourth in a series of reprints from Farmstead Magazine made possible by George Frangoulis, founder, publisher and editor of the magazine which was so helpful to those of us going back to the land in the 1970’s and 1980’s. Plowing with a Draft Horse (Part 1) appeared in Small Farmer’s Journal Volume 37, Issue 2, Spring 2013.
Success in getting a satisfactory planting of a field crop will depend on two factors: achievement of a loose, smooth seedbed, and the care with which you set up and gauge the planting machinery. I will discuss both of these factors in this article. The only exception to this rule is if you are a “no till” farmer and control weeds completely with herbicides. This point may be academic however, because I don’t know of any horse farmers who are “no till” farmers!
In approaching this subject, I am fortunate to be able to ask the advice of Albert Cutting, lifelong teamster and subject of an interview in Farmstead Magazine (Summer, 1977), for he has come to us for another visit. It was on an earlier visit three years ago that Albert said to me one day, after looking at a newly harrowed field in which I planned to plant oats, “You don’t mind my telling you your business, do you?” I didn’t dare say no, so Albert went on to say, “You have to have dirt, and you won’t get it harrowing that way.” He explained that in addition to running up and down the field, you had to cross harrow, and then harrow 45? in order to cut up all sods and reduce the field to the desired, even, fine dirt necessary for good planting. After following Albert’s tillage instructions, the grain drill set the seed at a consistent depth, and the covering board behind the drill smoothed the dirt firmly over the seed. An excellent set of oats and a good harvest followed.
Yes, horses (or mules or oxen) can till the ground for you, and haul the planting equipment, too. In harrowing with disc or springtooth, they will not break any records, for this is the hardest work they do because of the constant load and soft footing. There are, however, positive advantages to tilling and planting this way, as there is less compaction of the soil than occurs with tractor use, and field work may be done when the soil is too wet for a tractor. (I am reminded of a news photograph of a corn picker being pulled through a wet corn field last fall by a tractor. Ahead of the tractor is a team of horses). In addition to being able to get on wet land before a tractor, horses can work land that is too steep for tractor cultivation.
Sometimes compaction may make the difference between being able to grow a particular crop and in not being able to. An example of this has been related by Wendell Berry in “The Unsettling of America” (Sierra Club Books, 1977), a tractor farmer who sold a farm to an Amish man who, of course, worked with horses. The former owner had not been able to grow alfalfa on the heavy land, and had intended to warn the new owner of this, but forgot. When, in the course of his rotation, the Amish farmer planted alfalfa and got a good crop, the former owner decided that compaction of the ground by tractor use was responsible for his own difficulties in establishing a crop. He could only conclude that frost during the winters had loosened the soil, and that new compaction had been largely prevented by the use of horses in tilling and planting.
The disc harrow is the first implement we will consider, as its use follows plowing. (It should be noted here that the better the plowing job, especially on new sod ground, the better the results you may get from harrowing. On occasion I have had to hire a tractor with rototiller to break down a piece that was not or could not be plowed properly.) Normally a team will draw a “single” disc which consists of a row of discs (usually 12) set in two separate frames or banks, each of which may be adjusted with a hand lever. The first passes over plowed ground will be made with the discs in the two banks running nearly parallel to each other. Later, to get deeper penetration, the levers are moved forward, serving to make the two banks work at an angle to each other. This disc covers six feet at a pass, and the effect of double discing (that is to say of having two rows of discs, one behind the other) may be achieved by overlapping the passes half the width of the harrow. The double disc, also known as a tandem disc, could be used with a team only if cut down so that its draft is equivalent to the single disc. Single discs for single horse work exist, but involve correspondingly fewer discs and are narrower. Larger single and double discs may be used with multiple hitches of three or more horses.
Single discs for horse-use come with a pole, if for a team (or with a set of shafts if for single horse, or they may be equipped with a set of swiveling dolly wheels mounted in the frame ahead of the discs). The team evener is hitched directly to the dolly wheel assembly with a clevis, and thus the team, when reined, can steer the disc by turning the dolly wheels to one side or the other. Albert thinks, and I agree, that this arrangement is far preferable to the rigid pole or set of shafts, because the action of the harrow on uneven ground will tend to make the pole slap the horses on the side, and because the disc is much harder for the horse to turn with the pole than with dolly wheels. The single disc with wheels instead of pole is called a wheel harrow, and I am still looking for a good one, as they are hard to find. In the meantime, I have achieved almost the same result by cutting off the pole of the single harrow and hitching the stub directly to a pole cart or hitch cart with its own set of wheels and pole. Another advantage to the wheel harrow is that a three horse evener may be substituted easily for the double tree or team evener, and an extra horse employed. Because we have a spare horse, partly for breeding purposes, we often do this as it makes the work faster and easier. Each bank or frame of discs has a section for carrying weights, and the more weight carried, the deeper the penetration, and the better the result, but also the greater the draft on the horses.
Horse discs in good condition are difficult to find. The discs should not be worn out, the frame should be intact, and the bolts tight. Also important, the spring steel disc scrapers should be intact and in good condition, or the spaces between the discs will clog up with damp earth, and there is nothing more frustrating than having to stop on every pass and unclog the discs. To get a usable disc, you may have to improvise repairing, cutting up or otherwise adapting a set of tractor discs, but there is no reason why someone who is reasonably handy cannot come up with a serviceable implement in this way.
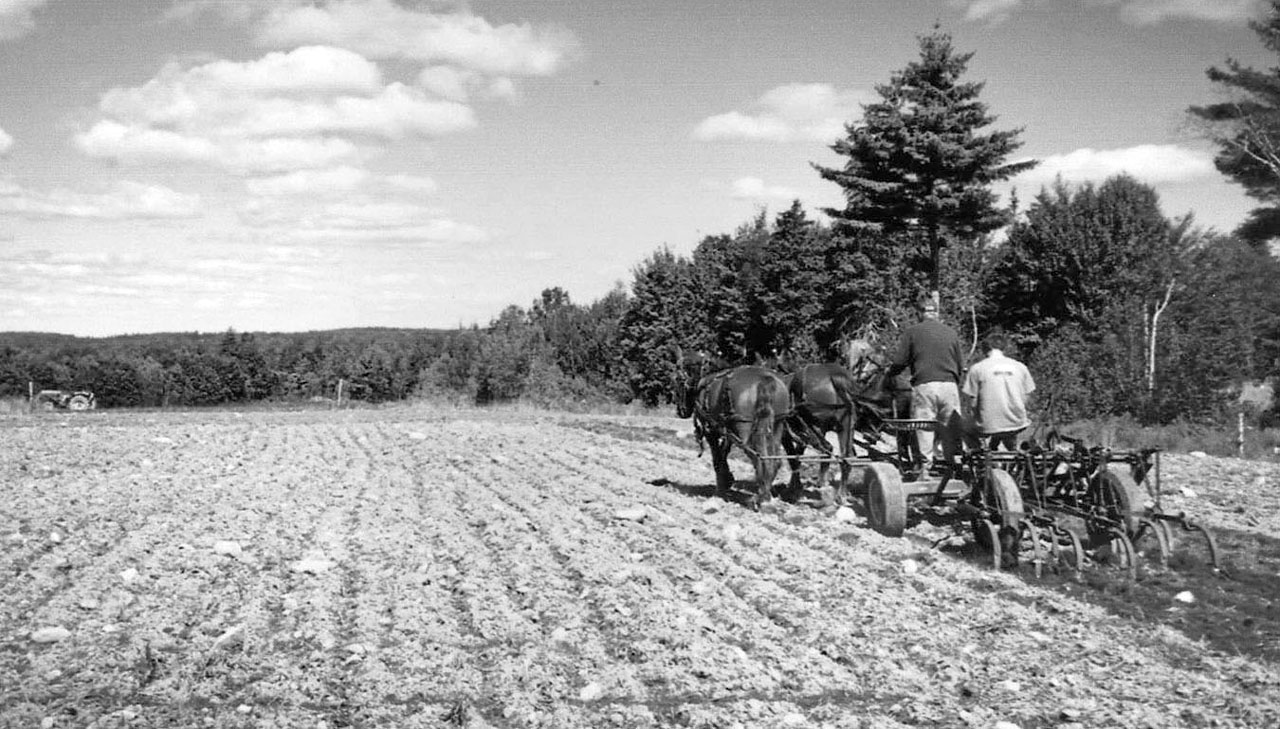
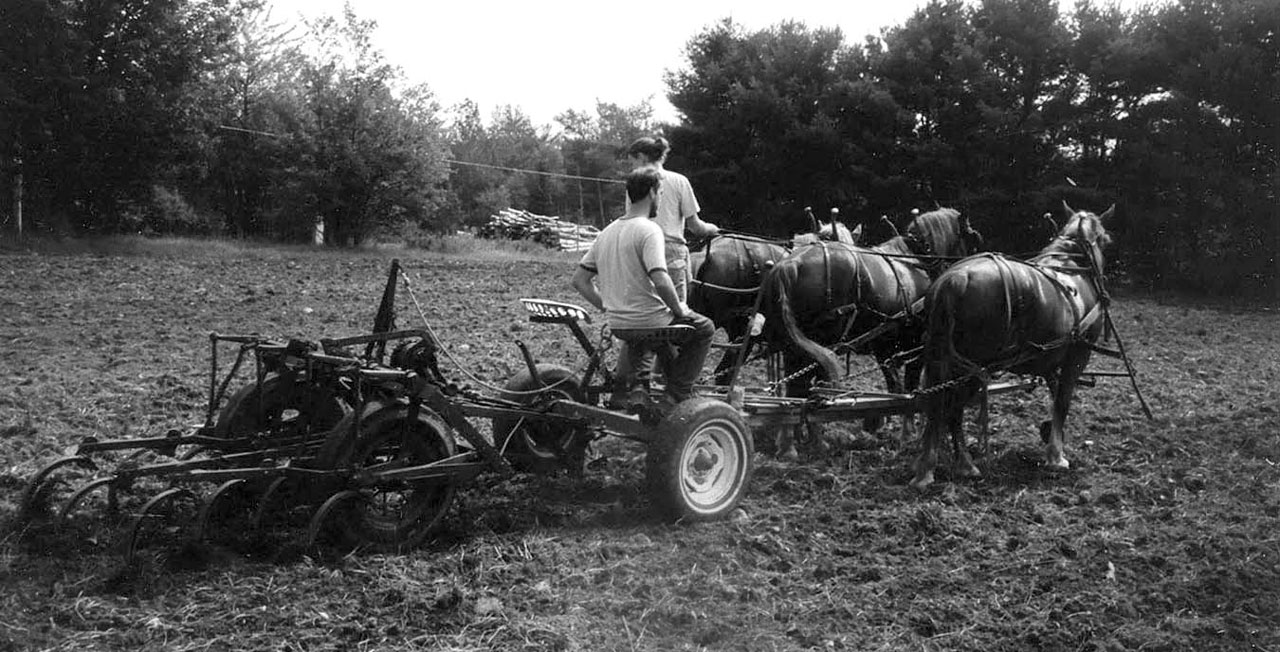
The next tillage implement that we use after the disc is the springtooth harrow. This consists of a frame about two-and-a-half feet wide into which are set eight or nine spring steel arms which pick and grab at the dirt instead of cutting it as does the disc. (Since our springtooths are buried under three feet of snow, the figures given are only approximate.) It serves to drag witch grass and weeds to the surface where the sun can dry them out, as well as to pick apart any fragments of sod left over from discing. These harrows may be combined for a wider pass, if more power is available, and for this purpose they are shaped so that they nest and bolt together side by side. We have been using two springtooths of different makes (found abandoned in the alders) chained loosely together behind a team or three horse hitch. This is acceptable, but it does not do as good a leveling job as a springtooth whose frames are bolted. I have heard of a team pulling four of these units but in general, the best ration is one springtooth per horse. Three horses on two springtooth sections will speed things up. Finding springtooths should not be too much of a problem, as they still seem to be in general use. They require little care and maintenance except you must make certain that the springteeth are bolted firmly in place. One other note, there is no seat provided on a springtooth, as there usually is on a disc. You will walk behind with the lines unless you feel like rigging up a hitch cart with a seat on which to ride.
The next tillage item is one that I was scarcely aware of until a year ago. For several years, I had noticed some peculiar looking 4” x 4” pieces studded with spikes sitting up on a beam in the sheep barn. Since no one came along to tell me what the mysterious objects were, curiosity finally got the better of me and I laid out what proved to be three pieces on the barn floor. The two pieces with the spikes proved to be beveled so as to fit and bolt together at one end to form a 45?angle. Then there was a spacer piece to hold the two main members apart in the rear. I put together the form, and an A-shaped object which proved to be a spike-toothed harrow, probably homemade on the farm years ago. Use of this implement became the third and last step in readying a seedbed for planting, for with a chain trailing between the rear portions of the harrow, and pulled by a team or single horse from the front or pointed end, we could smooth out the slight furrows left by the springtooth and at the same time continue to loosen the dirt and drag weeds to the surface. Spike-tooth harrows are to be found in old barns occasionally and were factory as well as homemade, usually with a rectangular frame. It should be fairly simple to design and make one for your own use.
An important consideration relating to both the springtooth and spike-tooth harrow is that their use may involve not only preparing the seedbed, but also maintaining the seedbed in condition to plant for some time. In biological agriculture, where no herbicide sprays are used, a means of ensuring minimum weed competition and subsequent need for cultivation is to delay planting somewhat in order to fallow the ground. Successive crops of weeds are destroyed by periodic tillage. This process has implications for fall tillage and later planting as well. The cleaner the ground at planting, and the cleaner it can be kept through the growing period, the easier it will be to harvest, and to establish a second crop, like winter rye for green manure, with minimum of extra tillage.
Last fall my oats ground was clean enough after harvest that I was able to simply cross disc and plant winter rye rather than go through the time-consuming process of plowing the whole field first. This got the green manure in sooner and enhanced its chances for a good start before cold weather. Finally, you have the field ready to plant and if you have followed Albert’s tillage advice, you should have a good seedbed. We now need to consider what kinds of planting machinery are available and how to set them up and use them.
Broadly speaking, a row planter will be used for crops planted in rows, and a drill will be used for crops, such as small grains, which are to be planted fieldwide. Successful planting will depend on the care with which you set up the machine and the accuracy with which you operate it in the field. Planting machinery should always be thoroughly cleaned out and lubricated after use, especially if an auxiliary fertilizer feed has been used. These machines should always be kept under cover, even if only a tarpaulin.
We have found the row planter to be about the most difficult machine we have to set up and use. The proper gauge should be selected for the seed size, and the machine should be tested to make certain the right amount of seed is being planted per foot of row. This may be accomplished by jacking up the machine (same applies to the grain drill), engaging the drive, and rotating the drive wheels a measured distance. By collecting and measuring the amount of seed put down, it is possible to calculate the amount of seed sowed per foot of row and per acre. (Grain drills generally have instructions governing feed, so that it is not as necessary to check them, unless results seem to require it.)
It has taken a couple of years to get our row planter to put down dry beans properly. To begin with, we often had to recover a planting of beans after rain by hand. Finally I learned that the trailing covering plates were worn out and had to be replaced. Last spring, after planting a few rows of dry beans, I suspected trouble and suspended operations until a worn part could be replaced which was causing misalignment of the feed components and, thus inadequate feeding of the seed. I would have saved a lot of time and prevented some crop failure if I had gotten someone experienced to help me rebuild and set up the machine properly to begin with. As to speed of planting, two acres of beans will take between two and three hours to plant. We generally plant four acres a year.
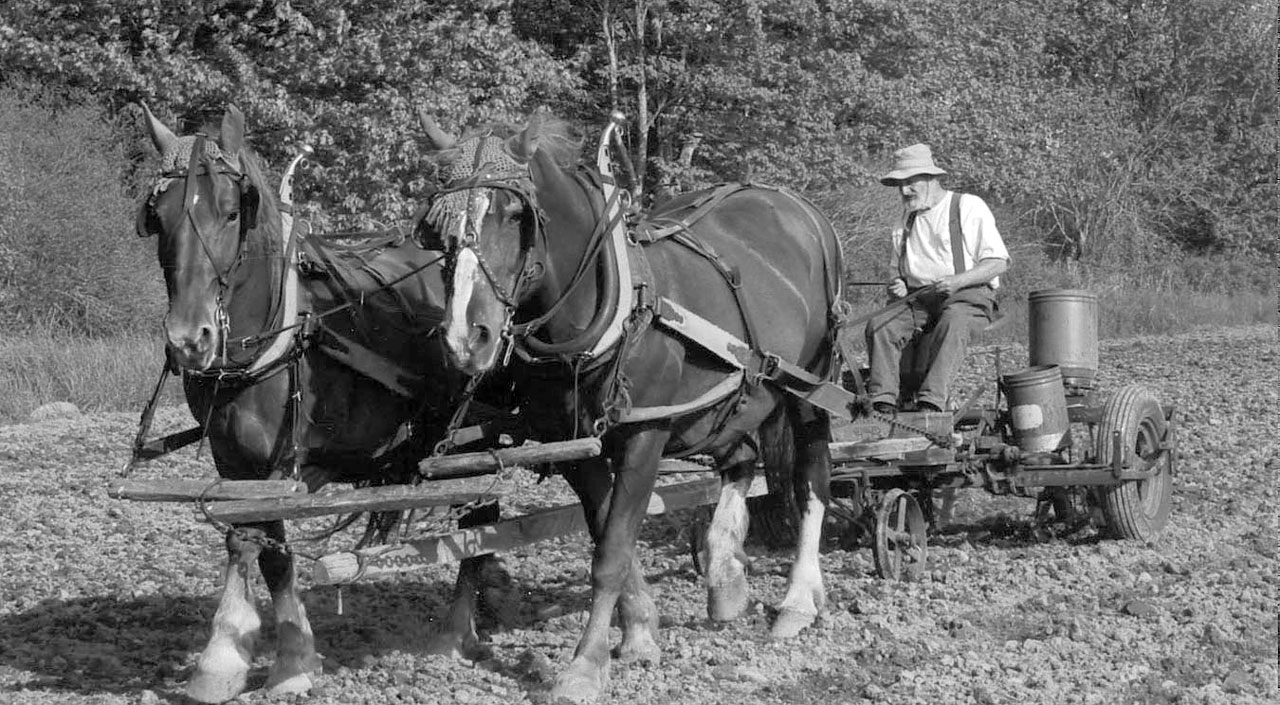
The grain drill has proven a lot easier to use than the row planter, and we have had good results with both a John Deere type drill and one made by International, although the seed feeding systems are quite different. Of course you can hand-broadcast some acreage effectively, and the Cyclone seeder is also a good alternative. But if you have the team anyway, and can find an old drill for not too much, it’s a lot more fun (and probably more effective) to ride the drill and let the horse do the work. This leaves you somewhat free to keep track of the rate of feed and to check for problems. Our newer drill, for example, showed a mysterious tendency to clog with dirt and debris between two of the disc openers and their respective disc boots through which the seed comes out. Finally, by taking the parts off, we found that one had been broken and improperly welded, thus changing its shape and creating the problem. Fortunately a new part was available from the manufacturer and the problem was solved. Sometimes, when the drill is set too deep, or the field is not smooth enough, dirt will clog the opening in the disc foot through which the seed comes out. Then you have to loosen and dislodge the dirt with a small pointed object. Riding a grain drill is really very pleasant on a nice day, and the problems are not usually very great as long as you can keep the horses going fairly straight. We can plant an acre in about 45 minutes, we generally plant about six to eight acres a year and with our equipment, we could easily do more. One other suggestion; it pays to run a roller or cultipacker over the newly planted grain, as this serves to firm the dirt around the seed and help germination. This operation may also be horse-powered.
As with any technology for working the land, there are advantages and disadvantages to working with horses. Good equipment is hard to find, but by imitating the Amish people, you can adapt smaller tractor equipment for use behind a pole or hitch cart. You must not overestimate how much heavy tillage your horses can tow in a day. (They can certainly harrow several acres.) On the other hand, you can grow all your own feed, avoid compaction of the soil, and farm land too wet or steep for a tractor. The less the compaction of the soil, the less the draft or power needed to pull tillage implements through it. And lastly, there is nothing pleasanter on a spring day than to drive a team over the land, with all the prospects of a good growing season ahead, and without the snarl of a tractor engine to come between you and your surroundings. Also, horses don’t come up with blown head gaskets and flat tires at inconvenient times!
Postscript
When Small Farmer’s Journal stopped appearing in my mailbox, I shared the general sadness and concern. Also, with a couple of old Farmstead reprints still to write updates for, I hoped the interruption wouldn’t last so long that I might not be able to recall so clearly the events of forty years farming with horses. So it is good to resume the task.
Harrowing for seedbed preparation and planting hasn’t changed much, although some of the machinery has. As Albert Cutting, veteran horseman and my mentor in the early days famously remarked, “It makes a lot in the plowing.” In other words, the better the plowing job, the easier to harrow out a good seed bed. The main items of equipment used are disc harrow, springtooth, and spike-tooth harrow. (Of course there could always be one of the new cultimulchers in the future.)
We now have a much better single disc for a pair (or a threesome) than depicted in the reprint, but obviously we don’t use it anywhere near as much as a nice little 5’International tandem disc which I have had long enough and think well enough of to have rebuilt twice. Seems it was designed to go with the “Cub” tractor, and it cuts so well that we use three abreast on a forecart to move it. Of course, one advantage of the tandem disc over the single is that the single must be used so as to overlap 50% to get a double discing effect. New tandem discs are certainly available, but this one really does the job, at least as long as I can get parts for it. (The fact that parts are still available says something!) There is also a small single disc for one horse which mostly just sits.
As to spring tooth harrows, there are two which get most of the use. One is three sections wide, and is used to finish off a field, that is to say cover the length of the field and then across. With three horses and on a light setting this is quick work, and finishing up across the field leaves a nice pattern into which to plant, say a grain crop. Our “work horse”, a section spring tooth, a Pioneer is used behind a forecart with three abreast for all the challenging work such as dealing with witch grass. There are narrower springtooths such as one for a single horse, but these see little use. In addition, there is a single section Pioneer spike tooth harrow for final seedbed finish work in the market garden, that is if we are not planting into hills which served us so well last summer because of excess moisture.
Long ago by good luck we learned about and bought a John Deere field cultivator made for tractor use. It has 10 very large curved spring teeth spaced evenly across its 5’ width which can penetrate far deeper than a springtooth harrow. A line to the forecart enables the teamster to drop the teeth into working position with a quick jerk, whether standing or moving ahead. To pick up, maintain a steady pull while the team moves ahead, but don’t maintain the pull too long or the teeth will drop. An additional feature is a crank handle which adjusts the depth of the teeth when at work. This is an important addition to our tillage inventory as it deals with serious witch grass or quack grass infestations, and because the teeth being further apart, will not clog up with witch grass sod the way a springtooth can. As with a lot of the older machinery, I have never had any serious mechanical difficulties, though I discovered last summer that changing a tier can be a real challenge because of the way in which the machine is assembled.
To update our planting equipment, I am still relying on the 8’ International steel grain drill pictured in the Farmstead article, though these days I use a forecart with two horses (three if in a hurry) rather than a tongue truck which requires me to sit on the drill. Some parts are still available and I am going to try to substitute rubber seed tubes beneath the large seed box for the original spring steel tubes which are deteriorating.
This machine is used a lot as our fallow fields get a crop of buckwheat in early summer, followed by the winter cover crop in the fall. Crop fields when clear get a cover of winter rye if at all possible. Of course we seed down hay fields with the oats in the large seed box and the timothy and clover in the fine seed box feeding simultaneously.
Given there was no comparable machine around, there were times when a neighbor would borrow the drill to plant a hay seeding. I had some reservations as sometimes there was a little wear and tear evident when the drill came back. In particular, one neighbor planned a seeding and intended to use chemical fertilizer in the fertilizer feed which I never used. I tried it successfully with organic fertilizer, and it worked fine. My mistake was that I didn’t clean it out before he put in the chemical fertilizer. Perhaps because the combination sat overnight, it set up like cement, and when he went to use the drill the next day, the wheel hubs (castings which incorporate the drive mechanism) shattered. Luckily I found replacement hubs on a junk International drill, but that was the last time the drill was loaned out.
I realized that it was important for other farmers in the area to get their seeds planted, so I would offer to plant a neighbor’s grass seed and my oats free of charge, then at the appropriate time I would combine the oats for my own use. (Some years our grain bin over flowed, so it worked out pretty well for everybody.) On one occasion, however, I was embarrassed to find, on checking the fine seed box about halfway through the planting, that I had adjusted the grass seed feed way too light, so had to start the field over again. I’m sure my work team must have wondered what was going on.
This drill has had a very useful 40 year career on the farm, but it was only a few years into my ownership that I began to learn enough about its prior history to raise some doubts as to actual ownership. Originally I had been approached by a woman summer resident who had purchased one of the local farms. She said there was a machine sitting out under a tree, and that I could have it for $10. What I later learned was that the machine had been borrowed by the farmer who formerly owned her farm, and never returned. For a while, this was all I knew, but eventually I found out who the lender was, a farmer whom I knew and respected. I approached him with some trepidation, as by this time I had “owned” the drill for quite a long time, but he graciously told me that I could keep it. One final note, just to set the record straight, in the original Farmstead article the drill is pictured with rubber tired wheels, but I replaced them with steel wheels, feeling the rubber tires were vulnerable. (I still have them.)
In terms of two row planting capability, things are a lot better than they were, though it has been something of a struggle to come up with a reliable two row machine that can be used with horses, and have an identical machine for spare parts. Having discarded the original “King of the Cornfield” planter, I thought I was all set with a John Deere #999 horse drawn planter with operational row markers, but I learned the cast seed plates were obsolete. I would have to get a later planter that would operate with the current plastic seed plates, probably a tractor model. (If I had had the right cast seed plates, and perhaps some spares, I would not have sold this nice, easy to use machine.) The replacement two row planter was an early John Deere tractor model with a drop and lift mechanism controlled by a line to the tractor. This machine seemed to have done a lot of work, and it is a good thing my older son, Nat, happened to have an identical machine which he no longer needed, as later on I had to replace the gearbox on the working machine which was completely worn out.
Adapting for use with horses, I found a seat support which would bolt up to the frame. (The seat is a “Worcester Buckeye” cast mower seat which I should probably replace, as I believe this seat has some value as a collector’s item.) Seated on the machine I could now operate manually the drop-lift lever formerly managed from the tractor by a line. Originally, dropping the planting heads put the machine in gear, but this is now accomplished manually with a separate lever. Thus the machine can be operated very satisfactorily with a team on a tongue truck ahead. There are row markers, but I never figured out how to make them work. Instead, I drive using the last wheel mark as a gauge, and this seems to assure fairly straight rows. We generally plant over an acre of Black Turtle beans every year, and sometimes a little corn.
One lesson I learned early on with this machine came as I was planting several acres of dry beans with my all time favorite team, Belgian half sisters Bonnie and Mayday. I was pretty well to one end of the field when it became apparent that the main drive chain was missing. Although alone, I had no hesitation tying off the reins and walking some 600’ to 700’ to find the missing chain. I replaced all the chains on the planter that winter.
Having covered the conventional tillage tools for creating a good seedbed, perhaps the next and most logical machine to consider is the new and apparently popular cultimulcher which has several makers. This also affords an opportunity to mention the two fairs I attended on successive weekends in late September last fall, MOFGA’s Common Ground Fair at Unity, Maine, and the Draft Animal Powered Gathering at Baron, Vermont. In addition to its focus on organic and sustainable agriculture, the Maine Organic Farmers and Gardeners Association is among the very few fairs offering draft animal working demonstrations on the fairground field plots utilized for vegetable production under MOFGA’s Farmer in Residence program. DAPNet’s Barton, VT gathering featured an extraordinarily diverse series of workshops, demonstrations and presentations too numerous for any one person attending to take in. There was a cultimulcher parked on the edge of ground that had been worked up for tillage demonstrations, another indication of the widespread interest in this machine.
At Common Ground Fair, our working demonstration sequence had started with horses spreading compost on a portion of the field plots which was then plowed. Normally, what would have come next would have been discing and harrowing with a spring tooth, but there was a prototype cultimulcher available and one of our demonstrators, Ken Lampson, a local farmer, had a three horse team, so with this combination, the rest of the final tillage was accomplished with impressive results. Then, my grandson Drew with our team of Suffolks on a drill completed the demonstration sequence by planting a winter rye cover crop.
Fairs like these can be stimulating because of new information, or new interpretations, and I was interested to learn that the use of horses in market vegetable production was increasing, and that a ratio of horses to vegetable land of about one horse per acre had been identified. This got me thinking about the extent to which the number of horses in general agriculture is increasing. Too bad no one is keeping track, but there are some factors which permit one to speculate.
The relatively recent development of a largely Amish infrastructure of shops and factories is one example. Pioneer Manufacturing Company dates from 1986. When I started out in 1973, there was only one “new” horse machine on the market that I knew of, a manure spreader. Today we have Horse Progress Days drawing thousands over a couple of days. Would manufacturers be coming out every year with so much innovative horse machinery if there were not a market? Another indicator might be apprentice applications which seem to bear out that interest in horse powered farming is growing.