


Case 4-F Two Way Plow
Setup and Operating Instruction
Attach bottoms to beams with four bolts. Draw nuts tight.
Raise levers about half way up on quadrants and tip frame up so ends of levers rest on ground.

- Remove grease cap and lock ring from axle box. Slip wheels on axles but do not tighten set bolts. Tip plow back so it rests on wheels. See operating instructions for greasing wheels using lock ring.
- Slide beams in position over rear bails and under front frame. Fasten beam castings to adjustable castings on bails, using outside holes for 14” bottoms and center holes for 16” bottoms. Reverse the bail castings and use the outside holes for 12” bottoms. Adjust wheels so the distance from inside edge of tire of either wheel to point of share is about 2 or 3 inches greater than cut of the bottom. Tighten set bolts in wheels evenly so wheels will run true.
- Bolt coulter brackets with stems attached to inside of beams in front of bails, using front bolt in beam bracket to fasten rear of coulter bracket to beam.
- Remove set collar on coulter stem and slip coulter on stem, having collar in slot on yoke, and tighten set collar.
NOTE – Set coulters about ½-inch toward land from point of share and up or down as the conditions may require.
- Bolt seat spring to top of frame, having bend of spring to the rear.
- Bolt seat and wrench hook to seat spring.
TO SET POLE FOR 3-HORSE HITCH – See Figs. 4 and 5 for 2- and 4-Horse Hitch
- Bolt rear end of pole to bracket on right hand side of frame, putting bolt up through bracket, rear end of pole (have pipe bushing in end of pole) and pole block. Have flat side of pole block next to pole.
- Bolt steering lever and quadrant assembly to left hand side of pole with two bolts, having bracket over frame.
- Connect shifting link on front of frame to shifting crank and secure with cotter.
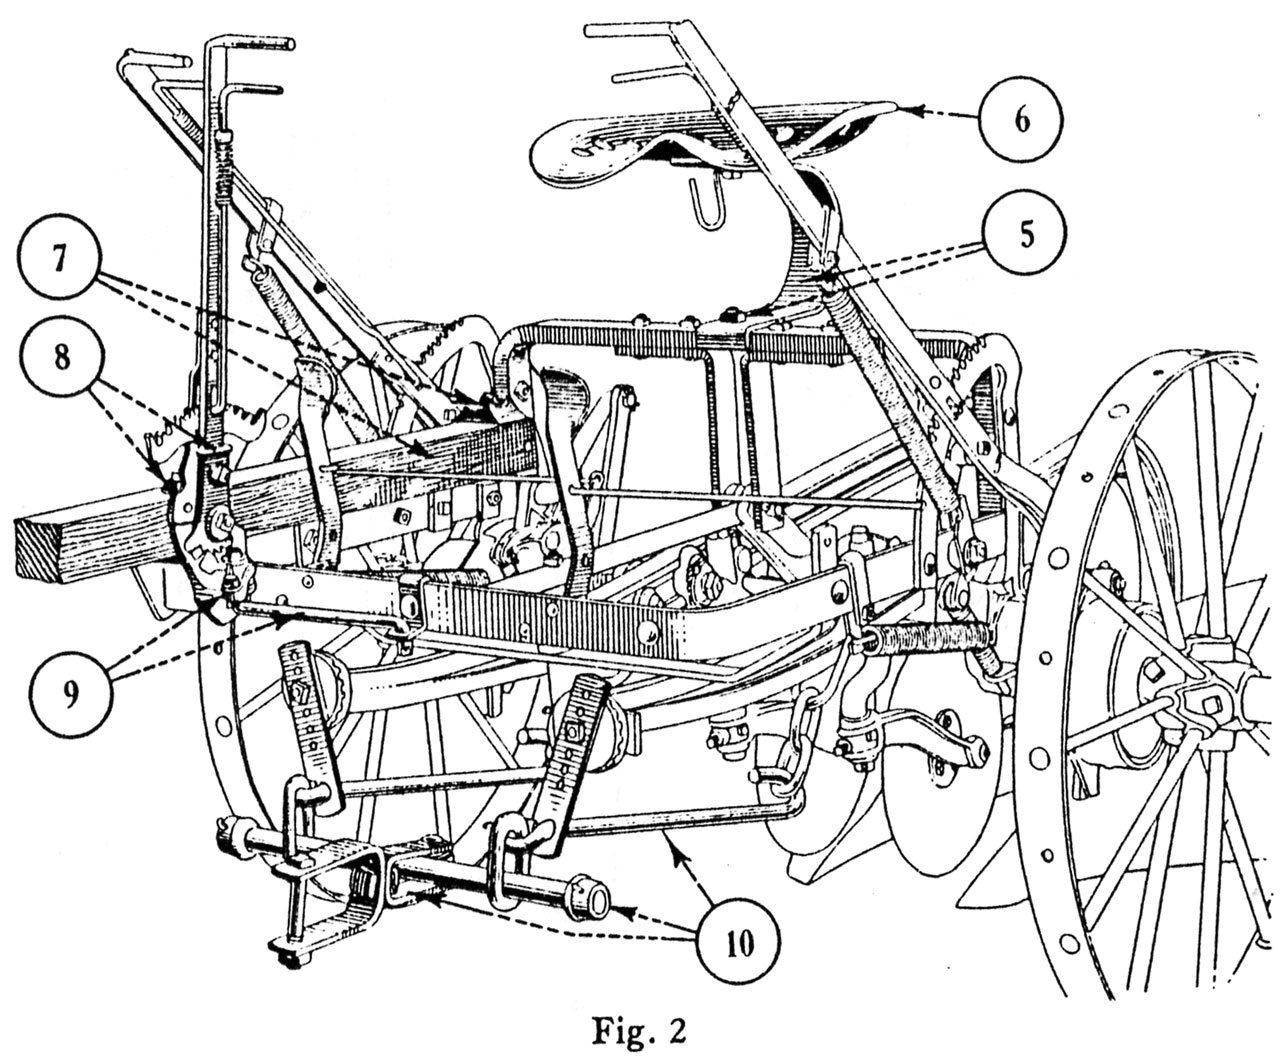
- Attach clevis bar to links in ends of draft rods, placing hitch clevis on clevis bar at same time. Rosettes on front end of beams must be adjusted for three horses. Fig 2 shows an approximate setting for three horses.
Assemble evener and attach to hitch clevis.
CAUTION. Be sure the roller on hitch clevis is free to turn. Loosen roller if necessary and oil thoroughly. Do not use heavy grease.
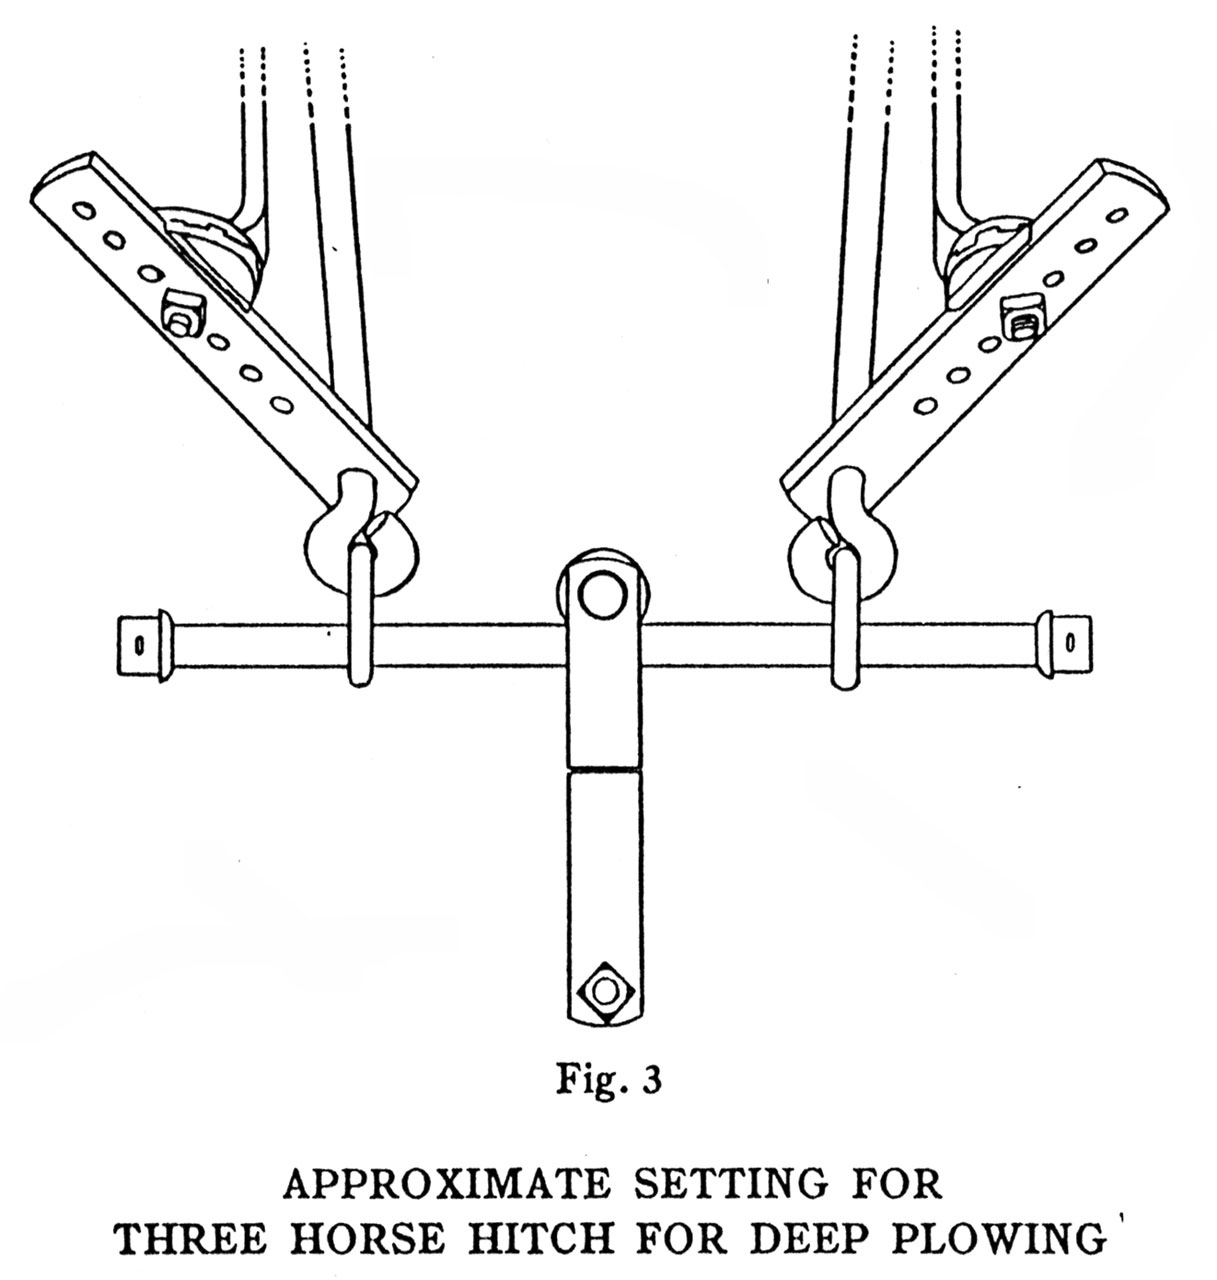
APPROXIMATE SETTING FOR THREE HORSE HITCH FOR DEEP PLOWING
To set for deep plowing, 10” to 12” with three horses, place hitch adjusting bars in a slanting position on rosettes so draft links are on the inside of beams as shown. Have hitch adjusting bars attached to rosettes in fourth hole from top end of bars. See Cut.
NOTE. For plowing from 6” to 8” deep, use fifth hole from top end of bars and adjust rosettes one notch so hitch bars are in a more perpendicular position.
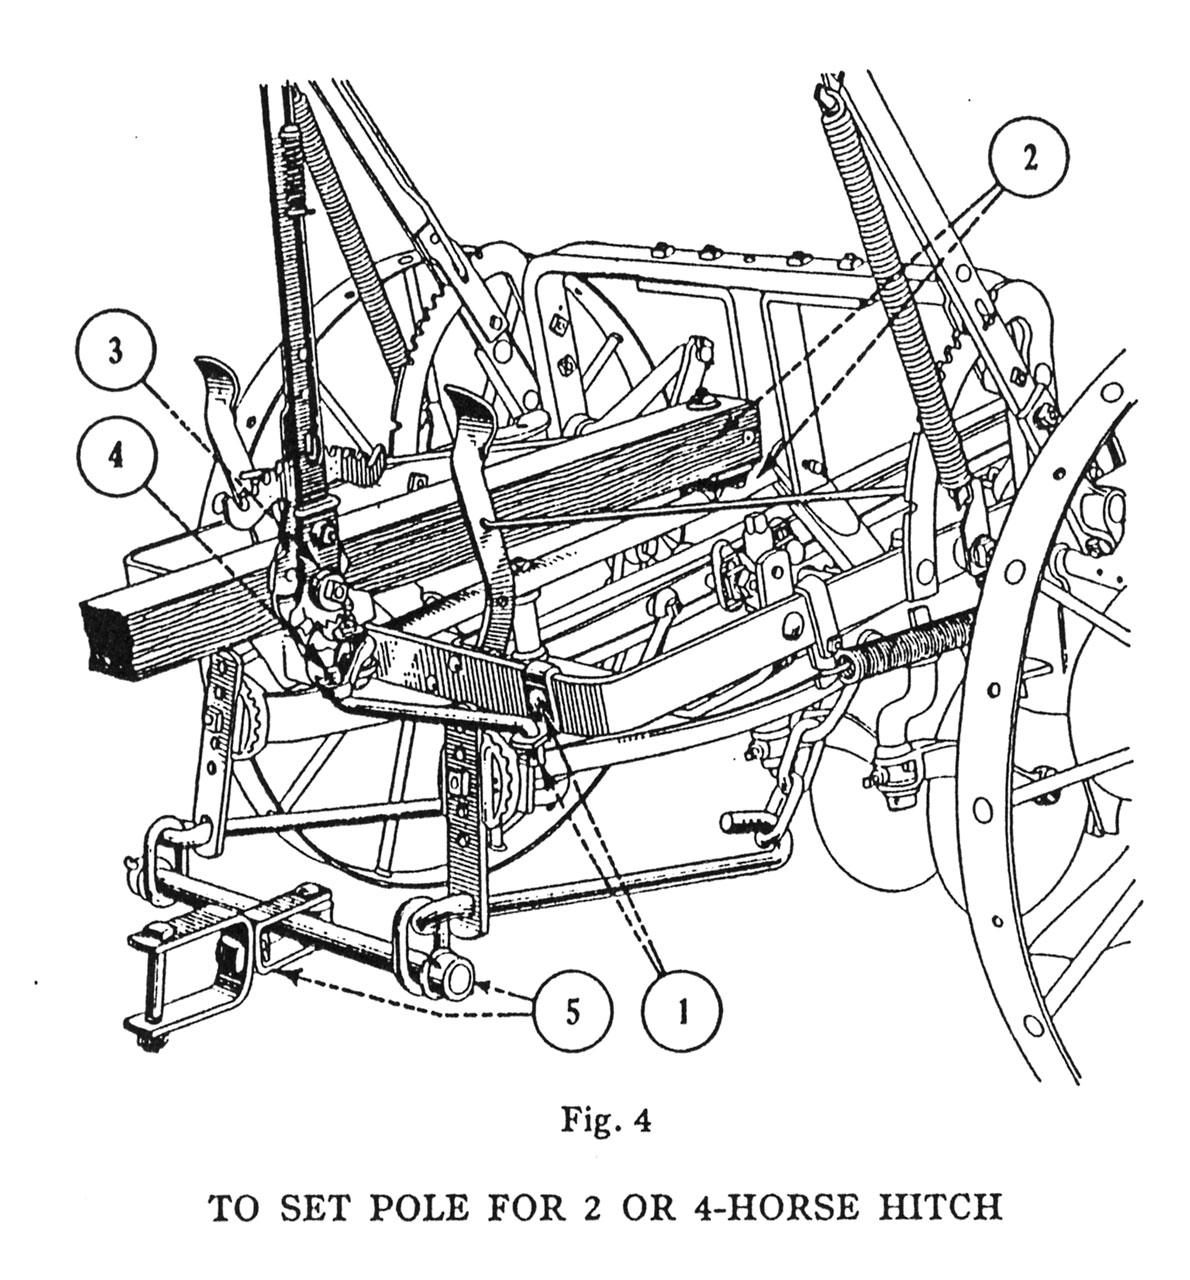
TO SET POLE FOR 2- OR 4-HORSE HITCH
- Bolt shifting link, on center of front frame, to left hand side of frame, using bolt found in frame. Tighten bolt where link was removed.
- Bolt rear end of pole to U bar in center of frame, having pole block on top of U bar and flat side next to pole.
- Bolt steering lever and quadrant assembly to left hand side of pole, having bracket sliding on frame.
- Connect shifting link on frame to crank on lever assembly and secure with cotter.
- Attach clevis bar to links in ends of draft rods, putting hitch clevis on bar at same time.
- Attach evener to hitch clevis.
CAUTION: Be sure roller on hitch clevis is free to turn so evener will shift easily from one side to the other when going back and forth in the field.

APPROXIMATE SETTING FOR TWO OR FOUR HORSE HITCH FOR DEEP PLOWING
To set for deep plowing with two or four horses, place the hitch adjusting bars in a vertical position with the draft link under beam as shown and have adjusting bars set in the fifth hole from the top. Figure 5.

INSTRUCTIONS FOR ADJUSTING AND OPERATING
The lock ring on the wheel box is used to lock the grease cap in position. To grease wheel, screw lock ring on box as far as possible, fill cap with good grease and screw on wheel box as far as possible. Do this several times, until the grease is forced out of the bearing or until bearing is thoroughly lubricated. Now fill cap with grease and screw on wheel box five or six threads or just far enough so cap is firm on box. Back lock ring up to cap and tighten. This holds grease cap in place. When bearings need more grease, loosen lock ring and give cap a few turns on wheel box and again tighten lock ring against cap. When cap has finally been screwed on box as far as possible, refill cap and use as before.
Spin wheel on axle to see if it is running true. If not running true, the wheel can be set true with the bolts in hub.
TO OPERATE
It is impossible to give a definite place to set the dial clevis and hitch, as this will vary according to conditions.
Figs. 3 and 5 illustrate approximate settings for the hitch.
FOR SHALLOW PLOWING
Adjust the hitch down until the heel of the landside rests flat on the bottom of the furrow. The hitch should always be set as high as possible so that the plow will take the ground quickly, but care should be taken to see that the heel of landside runs flat in bottom of furrow. In case the plow has a tendency to run on its nose, the hitch should be lowered slightly until the heel of the landside runs flat in the bottom of the furrow. The position of the draft bars in a sidewise direction should be maintained by moving the hitch adjusting bar out as the bar is tilted downward.
If the plow has a tendency to come out of the ground, adjust flat bar on front dial of clevis up just enough to keep plow in the ground. Do not adjust too high as this will increase the pressure on the wheels and make the plow pull harder.
The hand levers are for depth and leveling frame. When plowing with right hand bottom, the right hand lever is for gauging depth and the left hand lever is for leveling. When plowing with left hand bottom, the left hand lever is for gauging depth and the right hand lever is for leveling. Frame should be set as nearly level as possible when plowing. CAUTION. Do no fail to keep the pinch bolts right in ends of adjusting levers.
The lever on pole is for shifting the pole and should be used on side hills or when plow tends to run one way or other. See that the furrow wheel runs about 2 inches out in the furrow.
The foot levers are for the purpose of raising and lowering the bottoms and should be pushed firmly until clutch engages, after which remove the foot quickly, and the bottom will either raise or lower as the case may be and automatically locks in position. Do not hold the foot on lever too long or the clutch will revolve clear around.
When plowing deep, the coulters should be rocked back by means of the slots in bracket.
Remember, oil is cheaper than repairs, and keep all moving parts well lubricated.
SHARES should be kept reasonably sharp to obtain a good job of plowing and to maintain light draft.