


Horseshoeing Part 4A
A Text-Book of Horseshoeing
Part 4A
by A. Lungwitz and John W. Adams Copyright 1897
CHAPTER III continued
Shoeing Saddlers and Hunters.
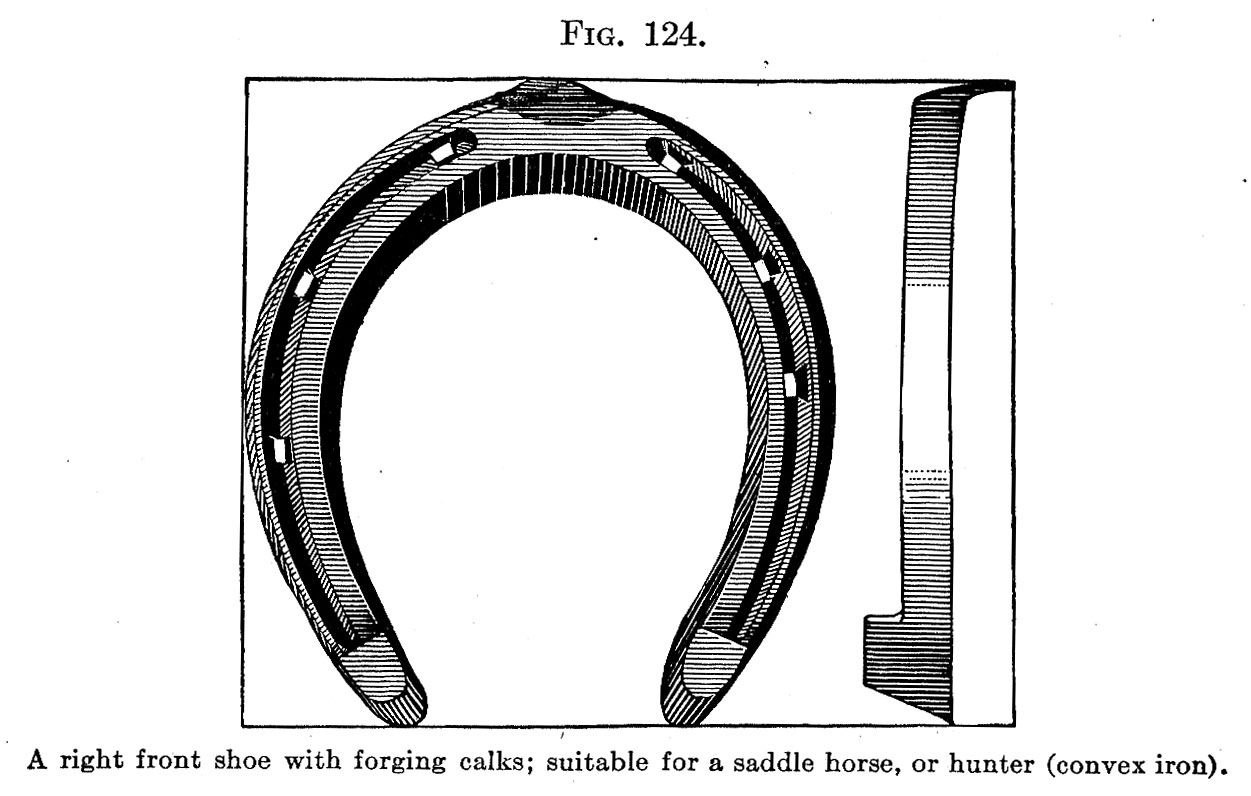
The shoes for saddlers (Park Hacks) should be light, short, and fitted snug to prevent forging, interfering and pulling of the shoes. The hoof surface should cover the wall, white line and at least one-fourth of an inch of the margin of the sole. An average width of one inch is desirable. Both front and hind shoes should be fullered and concaved on the ground surface (convex iron). The Front Shoe: – Length, should not project beyond the buttress more than one-eighth of an inch. Width, an inch at the middle on the branches, somewhat more at the toe, and less at the ends of the branches. Beveling, outer-border, base-narrow all around. The ends of the branches, and the heel calks, in case they are used, are bevelled strongly downward and forward under the foot. The toe is rolled from the inner edge of the web, and provided with a strong central clip. Six nails are sufficient (see Fig. 124).
The Hind Shoe: – Length, the shoe may project from one-fourth to threeeighths of an inch behind the buttresses. The toe should be well rounded and somewhat blunt so that the horn of the toe will project beyond the shoe an amount equal to one-half the thickness of the wall. Width, somewhat less than the front shoe. The branches are of equal thickness, and should carry heel calks whose height equals the thickness of the shoe. To guard against interfering the inside calk may be omitted and the inner branch thickened, fitted snug and bevelled strongly base-narrow. Clips are to be placed at inner and outer toes. Seven nails are sufficient.
The shoes for hunters do not differ materially from those suitable for Park Hacks. The hunter’s shoes are somewhat lighter, and to guard against injury to the feet by over-reaching and interfering, and against the shoes being pulled by stiff mire and by treading, the shoes must represent merely a prolongation of the hoofs, i.e., must be no longer and no wider than the hoofs themselves. The front shoe of narrow, convex iron is rolled at the toe and has a central toe clip. Forging heel calks are advisable.
The hind shoe is set back at the toe, carries inner and outer toe clips, an outer heel calk and an inner interfering branch. Seven nails.
Shoeing Runners.
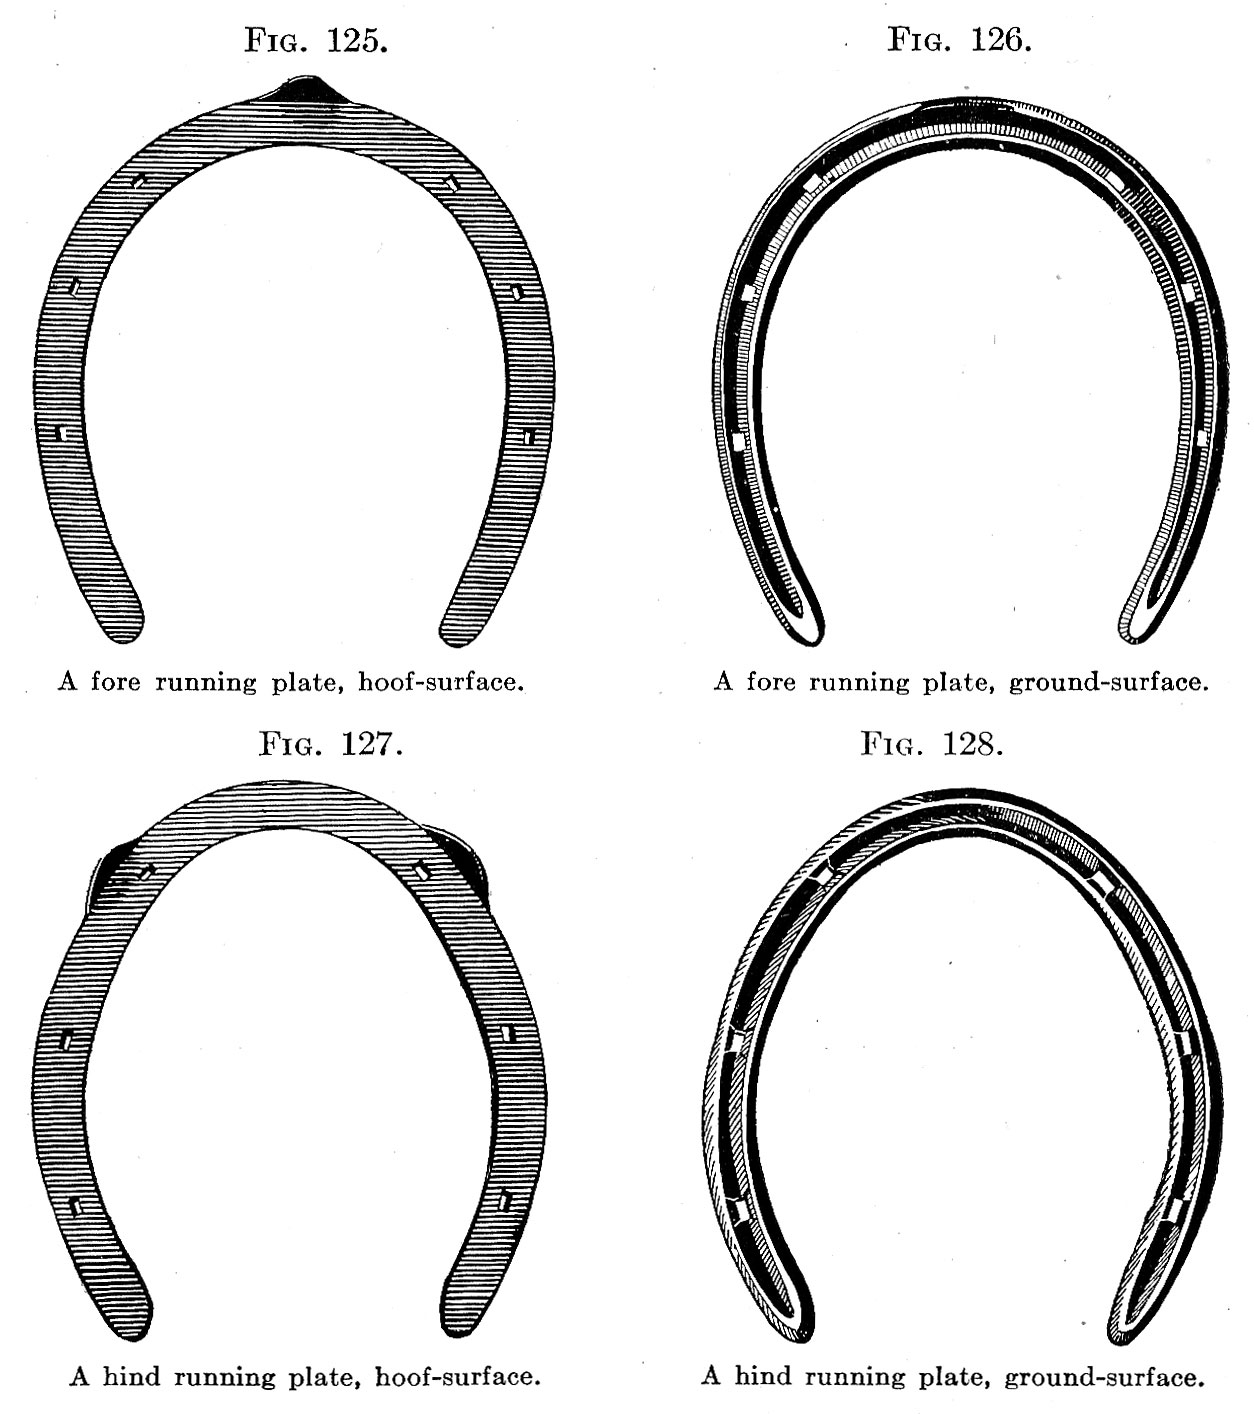
Racing plates are intended solely to prevent excessive wear and breaking away of the wall, and to insure a secure foothold upon the ground. The shoes are made as light as possible, but they must not be so narrow and thin that they will bend or break. They are therefore made of steel, wide enough to cover the bearing surface of the wall, white line, and an eighth of an inch of the sole. The ground surface is divided into two sharp edges by a deep, clean, fullering continued entirely around the shoe. Heel calks are of no advantage. Front and hind shoes carry six nails. The last nails are well back in the quarters to prevent the spreading or bending of the light shoe. Front shoes are provided with central toe-clips; hind shoes carry inner and outer toe clips and are set slightly under at the toe (see Figs. 125, 126, 127, 128). An average weight running plate for a medium-sized hoof is three to four ounces.
Shoeing Trotters and Pacers.
The shoes worn while the trotter or pacer is in training are somewhat heavier than those worn while racing. Training shoes will average 40 ounces to the set, while trotting and pacing plates weigh from 16 to 28 ounces to the set. In short, extreme speed at running, pacing or trotting demands as light a shoe as can be made, which will at the same time furnish a bearing for wall, white line and a narrow rim of the sole.
In style of shoes there is no marked difference between trotters and pacers – except in the hind shoes of pacers that cross-fire. Open shoes predominate. Bar-shoes are used, not to give frog pressure, but to stiffen and prevent spreading of the shoe, when after a few days’ wear it becomes thin at the toe. The average trotting and pacing plate is so thin that it would be weakened by fullering, so most of them are stamped (punched). Six nails are sufficient. Clips are seldom needed.
Pacers usually require a low circular grab or “rim” at the toe. This is set flush with the outer border, is about one-eighth of an inch high and is brazed on. Trotting plates are usually without toe calks, though many are fullered across the toe (corrugated) to furnish a grip upon the ground.
On both trotting and pacing shoes the heel calks should be low and sharp and should run straight forward so as not to retard the forward glide of the foot as it is set to earth heel first. The heel calk serves chiefly to prevent the lateral twist of the foot as the horse takes the sharp turns of the track.
Freak shoes, toe-weights, side-weights, excessive length of hoof or toe, and other unscientific appliances and methods of shoeing speed horses are being gradually eliminated, and today the fastest are dressed and shod in accordance with the principles enunciated in this book.
Fitting Shoes to Heavy Draft-Horses.
What has been previously said concerning shoeing holds good here; however, the conditions of shoeing are somewhat different in heavy horses, and particularly with respect to hoofs which, without being clearly diseased, have been injured by shoeing. The entire operation requires more circumspection, because it is more difficult. In many cases one will find that the width that has been advised for the outer branch of the shoe at the quarter is not sufficient. Indeed, if a horse has wry feet, and there is unequal distribution of weight within the hoof, and we attempt in shoeing it to follow to the letter the directions given on preceding pages, we would be apt to favor the perpetuation of the defect. In such cases the slant of the wall at the quarters is of the greatest practical value to us in estimating the proper width for the shoe at this point.
When uniform setting down of the hoof and uniform wear of the shoe are desired, every point in the coronary band in the posterior half of the foot must receive support by the shoe. This applies particularly to the outer halves of hoofs that are extremely base-narrow. If, for example, the coronet of the outer quarter projects beyond the plantar border of the quarter, the outer branch of the shoe from the last nail-hole back must be kept so wide (full) that an imaginary perpendicular line dropped from the coronary band will just touch the outer border of the shoe. The inner branch, on the contrary, should follow the edge of the wall as closely as possible. Furthermore, the new shoe should be given more curve, – that is, made wider and fitted more full where the old shoe shows greatest wear. The principal thought should be to set the shoe, which should always be regarded as the base of support of the hoof, farther towards the more strongly worn side. Such a practice renders superfluous the wide-spread and popular custom of bending outward the outer quarter and heel-calk of hind shoes. From the manner in which a horse travels and the wear of the old shoe, we estimate the distance that the branches of the shoe should be set from the middle line of the hoof. If in following out this plan the bearing-surface of the outer quarter of the wall is not completely covered, the quarter will be pinched and squeezed inward; this should be prevented by a broader branch punched so deeply that the holes will fall upon the white line (Fig. 129).

When the shoer has satisfied himself that the shoe fulfills every requirement and fits perfectly, it is to be cooled, the holes opened with an oiled pritchel, and the shoe brightened with a file. In filing, all sharp edges should be removed. If a shoe is to be filed upon the outer border, to give it a neater appearance, the filing should be done lengthways of the shoe, and not crossways; of course, the shoe must not be bent by being improperly clamped in the vise.
It indicates much greater skill in making and fitting shoes when they look clean and finished with little or no filing.
In the preceding remarks I have insisted upon a horizontal bearing-surface for all shoes, with the single exception of shoes provided with the rolled toe (rolling motion). As far as I can judge from the literature of shoeing, and from what I have seen with my own eyes in many countries, this is the most wide-spread practice. In Germany, on the other hand, there is another method, followed in the military shoeing-shops, which consists in placing the bearing-surface of the shoe as nearly as possible at right angles to the slant of the wall. According to this method the bearing-surface of the shoe, depending upon the direction of the wall (viewed from in front, from behind, and from the side), should incline more or less, now backward, now inward, now horizontal, and now outward. Shoes for wide hoofs are given a bearing-surface which inclines inward, while for narrow hoofs the shoes have a horizontal bearing-surface. Shoes for wry hoofs have a bearing-surface which inclines downward and inward for the slanting wall, and for the steeper wall a horizontal bearing-surface, which towards the end of the branch may incline slightly downward and outward. Besides, the bearing-surface of the ends of the branches, viewed from the side, has a backward and downward inclination. This method is practicable only in part.
I. Nailing the Shoe.
This is that act of horseshoeing by which the shoe is fastened to the hoof by special nails called hoof-nails or horseshoe-nails, which are driven through the shoe and horny wall.
At present there are hand-made and machine-made horseshoe-nails. Both kinds should be made of the best wrought iron. The nails must be slender, wedge-shaped, and twice as wide as they are thick. Thickness and length must be in proper relation to each other. We should never choose a nail which is longer than is absolutely necessary to hold the shoe; six to eight sizes are sufficient for all purposes.
The rough nails (hand-made), before being used, must undergo a special shaping to prepare them to pass through the wall easily and in the desired direction. This preparation is called shaping and beveling. In doing this we should see to it that the nails are made smooth, and even, but are not hammered harder than is absolutely necessary, because the lighter one can hammer the nails the better they will be.

Furthermore, we must give the nail that form which will insure its passing through the horn straight and not in a curve; with this object in view, the nail is to be slightly curved so that the side which is turned towards the frog in driving (inside) will be a little concave, the opposite side convex (Figs. 130, 3, and 131, No. 10), since it is known that a straight nail always passes through the horn in a curve, and not only does not long remain tight, but is quite likely to press upon and injure the soft tissues of the foot.
At the point of the nail the bevel is to be so placed that it will form a short one-sided wedge with the slanting side directed from within to without (Figs. 130, 3, and 131, d). A short bevel is suitable for nails that are to be driven low, while a long bevel makes it possible to drive them high. The bevel should never form a hook; it must always be straight, should be sharp but not thin, and under no conditions incomplete (defective).
Machine-made nails, smooth, polished, bevelled, and ready for use, are, for many reasons, to be preferred to hand-made nails, though the latter are rather tougher (see Fig. 131).

Before the shoe is nailed on it should be cooled and again carefully examined by a competent shoer, who should then place it upon the hoof, where it should be critically observed to see whether it really fulfills every requirement of a properly fitting shoe. Afterwards, the least fault or defect must be remedied, and then the work of nailing it begins. By nailing, the shoe is firmly and durably fastened to the hoof, in doing which the horn of the wall is spared so far as possible, the elasticity of the hoof borne always in mind, and wounding of the pododerm entirely avoided. The nails must in all cases penetrate the white line and pass through the wall in such a straight direction that they will appear neither too high nor too low upon its outer surface. In the first case there is considerable danger of pricking or close-nailing, and in the latter the nail-holes will tear out easily when the nails are being clinched.
In driving a nail, it should be held in the fingers as long as possible in the direction in which it is desired that it shall pass through the horn. A nail should be driven cautiously, with attention to its sinking and sound, and yet with enough force so that at each stroke it will penetrate from one-fifth to one-fourth of an inch. The power required at each stroke will depend upon the hardness of the horn and the size of the nail. Fearless driving and timorous tapping should not be allowed.
Nails, which at a depth of five-eighths of an inch are still going soft, or which bend and give a dull sound, or cause pain, should be immediately withdrawn.
According to the size of the horse and his hoofs the nails should be driven from five-eighths to an inch and five-eighths high, and as even as possible. As soon as a nail is driven its point should be immediately bent down towards the shoe in order to prevent injuries. The heads of all the nails should then be gone over with a hammer and driven down solidly into the nail-holes, the hoof being meanwhile supported in the left hand. Pincers are then held under the bent nails and they are more sharply bent by light blows upon the nail-heads. The points of the nails are now nipped off near the hoof, the horn which has been thrown out just below the clinches by bending the nails down is removed with rasp or gouge, and the ends of the nails bent down still more, but not quite flush with the wall. This operation is called “clinching.” A clinching-block or a pair of ordinary blacksmith’s pincers is then placed under the end of the nail, now called a clinch, and by light blows (in doing this the nail must not bend within the wall) upon the head the clinch is turned closer to the surface of the wall; finally, with the front edge of the nailhammer the clinch is hammered down flush with the wall. On the inner half of the wall the clinches should not be felt on stroking the wall with the fingers. The small amount of horn that projects beyond the shoe around the toe may be carefully rasped away in the direction in which the wall slants, but never higher than the clinches; finally, the sharp lower edge of the wall is to be removed by carrying the corner of the rasp around between the shoe and the horn.
A clinch is sufficiently long when it equals the width of the nail at that point.
It is of advantage to use a shoeing-bock or foot-stool in clinching the nails on the front hoofs. The hind hoofs may be clinched in the hands. Then the horse should be led out and again moved in order to see whether or not the new shoeing has actually accomplished what was desired. Finally, the entire hoof should be given a thin layer of hoof-salve.
K. Horseshoes More or Less Deficient in Desirable Qualities.
Machine Shoes.
1. Machine Shoes of Wrought Iron. – They are half-finished and finished. Though machine shoes with few exceptions show no distinction between front and hind, or left and right, with correct punching for these different feet, but usually present one form in different sizes, yet, unfortunately, they are in high favor with horseshoers, because they may be used for both summer and winter and for bar shoes.
For these reasons we cannot approve of machine shoes.
2. Finished Cast Shoes. – They are of four kinds, – ordinary cast shoes, cast shoes with rope buffer, cast shoes with fiber buffer, and cast shoes fenestrated to hold a rubber buffer. Ordinary cast shoes of correct form and proper punching designed by Grossbauer, of Vienna, are sold by Hannes’ Sons, of that city.

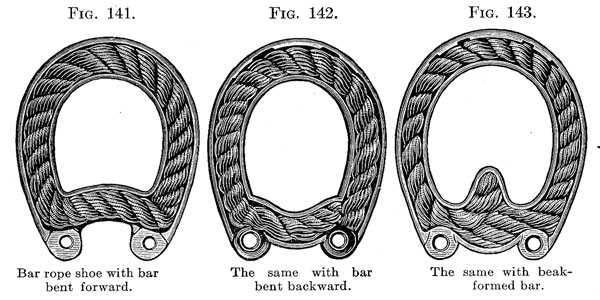
Rope Shoes. – These shoes have a groove on the ground surface, in which rests a tarred rope, which greatly diminishes slipping on smooth pavement. For this reason alone they are extensively used in the large cities of Germany. Since the open rope shoe, when half worn out, will warp, the bar rope shoe is more satisfactory and more extensively used (Figs. 141-144).

Before fitting the shoe the rope must be removed. After the nails are driven it is laid in the groove and hammered into place. Rope shoes can seldom be fitted properly to hoofs other than those which are healthy and of regular shape.
Fiber Shoes. – These have a groove on the ground surface into which layers of linen fiber belting have been tightly pressed. The fiber cannot be removed, and therefore the shoes cannot be heated, but must be fitted cold. The nail-holes are placed between the fiber and the outer border of the shoe, and are punched too light. The bearing surface of the shoe is unsupported, so that when the shoe is half worn out, it warps. There is no distinction between rights and lefts.
Rubber shoes have all the defects of fiber shoes, and one more. The hoof surface is covered with canvas, which under normal and acute-angled hoofs wears through under the quarters and leads to loosening of the last nails.
L. Rubber Pads.
The increasing use of asphalt, tarvia and other hard, smooth and slippery materials for surfacing city streets and country highways has not only made traveling in flat and even in calked shoes precarious, but has aggravated all those injuries produced by concussion.
To prevent slipping and the injurious effects of concussion a great many shoes have been devised, in which are incorporated such materials as hemp rope, linen fibre, papier maché, cork, wood, bast, felt and rubber, but all fail in greater or lesser degree to meet practical requirements.

Rubber, though the most expensive of these materials, is the most resilient and takes the best grip on smooth pavement. A pad of rubber, wide enough to cover the branches of the frog alone, or the branches of the frog and the buttresses of the hoof, firmly cemented to a leather sole, constitutes the modern rubber pad (Figs. 145, 146, 147).
The frog-and-buttress pad used with a short shoe is to be preferred to the earlier frog pad which takes a full shoe.

The advantages of rubber pads are:
1. They prevent slipping upon asphalt and other smooth, dry surfaces.
2. They diminish concussion, and are valuable in the prevention and treatment of sore heels, dry and moist corns, bruised sole, and incipient side bone.
3. They give frog pressure, develop the frog and tend to prevent contraction of the quarters and those lesions which may follow contraction, as corns, cracks of bars and quarters, laminitis of the quarters and thrush.
A rubber pad should not be used:
1. In contraction of one or both quarters, when the frog is too much shrunken to bear upon the pad.
2. In lameness from well developed side bones.
3. In navicular bursitis (“navicular disease”).
4. In thrush, or canker of frog or sole.
Rubber pads, light, medium and heavy, are made in all sizes and are suitable for all classes of horses, from the light roadster to the heavy draft type. The short shoe with which they are used reaches the middle of the quarters. The pad surface (upper surface) of the ends of the branches should be bevelled to conform to the pad, and to hold it firmly against the frog and buttresses. The thickness of the shoe should equal two-thirds the thickness of the pad, so that when fitted one-third of the thickness of the pad shall project below the ground-surface of the shoe. The shoe should be provided with a strong toe-clip. With the heavy, thick pad of a draft-horse a low toe-calk may be used, but heel calks should never be put on a short shoe. Pads are seldom necessary on the hind feet.